It's something that can be repaired with the addition of bushings through the tail post and/or larger-diameter bolts, but some changes can help prevent this problem from occurring.
Updated October 2003
Several years ago, I got a lot of shimmying from the back end of my Fly Baby after landing. Back at the hangar, I found that the lower attachment bolt (3/16") had broken. I replaced it, and went my merry way. However, recently the problem came back. Talking to other Fly Baby owners and researching the old Fly Baby Bulletins from the 1960s, I found this is a longstanding item that pops up.
It's something that can be repaired with the addition of bushings through
the tail post and/or larger-diameter bolts, but some changes can help prevent
this problem from occurring.
You'll also need to lengthen the filler block (a wood insert) in the bottom of the vertical stabilizer spar, to make it long enough so that the top hole in the new bracket passes through it. Taking the concave "bow" out of the block is probably sufficient, as the "yellow" modification to Figure 1-10 shows. However, Drew Fidoe recommends that the filler block be made long enough to also work as the filler block for the lower hinge (the "green" modification). While this will add some small amount of weight, this would simplify matters.

If you have an existing bracket and don't wish to make the changes, drill the mount holes in the tailpost out to accept a 3/8" bushing and drill the bushings to 1/4". Use 1/4" bolts (AN4) to attach the bracket to the tail post.
If you can fit the bracket square to the bottom of the tail post, that will help overcome the side torque.
If you've got fabric gap seals on your plane, these will have to be cut off to remove the rudder. They'll either have to be replaced when you're done, or you can go with some Proshold gap seals.
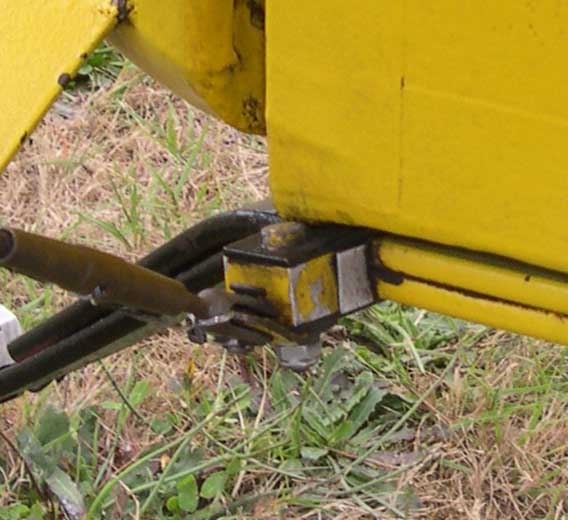
The tailwheel spring bracket attaches to the bottom end of the tail post, which projects down below the fuselage for six inches or so. The post is faired into the fuselage by a triangular box of thin plywood. You'll need to support the aft fuselage by other than the tailwheel to be able to remove the bracket. I brought a stack of old aircraft tires over, set them by the fuselage, then lifted the tail off the ground (using the tailwheel) and set the aft fuselage on the tires. This left the tailwheel dangling about two inches off the hangar floor.
Remove the two bolts on the clamp holding the spring to the bracket, drop the tailwheel and spring down a bit, then swing it to the side to gain access to the access hole in the plywood directly in front of the post. A few minutes work with a pair of wrenches removed the two AN3 bolts (3/16") holding the bracket to the tailwheel post.
As of this point, you have two basic choices: You can either install bushings for the existing holes, or install the taller bracket.
To stay with your existing bracket, drill the existing tailpost holes to 3/8". Go carefully, so you don't oversize the holes...I actually went to the next size down, and enlarged them by hand so the bushings fit snugly. Then drill out the holes in your bracket to fit the bolts that match the inside diameter of your bushings.
Going with the longer bracket is a bit tougher, since it's difficult (if not impossible) to match the existing holes on the airplane. What you'll have to do is plug the old holes and drill new ones.
To plug the old holes, find a dowel the next size larger than the existing holes. If you've got AN-3 bolts (3/16") in your tailpost, then you'll need 1/4" dowels. I use oak dowels from the local home improvement store. Again, drill the holes out carefully...you really want a good, tight fit.
When you've got the holes the right diameter, cut off your dowel to the width of the tailpost, and epoxy it in place. Let the epoxy thoroughly cure.
In the meantime, prepare your new bracket for installation. I suggest obtaining the bracket WITHOUT pre-drilled holes (except for those needed for the "clamp bracket" part that fits the tailwheel spring).
Anyway, shove a piece of scrap wood between the jaws of the bracket and mark the positions for the three holes down the center of the back leg of the bracket. You'ld like the center of the top hole to be about 1/2" down from the top of the bracket, and the bottom one to be about the same distance from the bottom...or maybe an eight of an inch more (5/8") due to the slanting nature of the bracket.
Drill these holes to 1/8", ONLY on the back leg of the bracket. Slide the bracket in place. Get it as high, straight, and centered as you can.
Then take your drill into the bottom 1/8". Aim as straight as you can, and drill through the wood to the opposite leg of the strap, and keep going until you're all the way through the strap as well. Pull the drill out, and slide another 1/8" drill bit (or even a fat nail) into the hole to keep the strap in position. Then drill out the center hole to 1/8", then to 5/32", then out to 3/16". Stick in an AN-3 bolt to hold the strap, then drill out the bottom hole in the same fashion.
Stick an AN-3 bolt in the lower hole, and drill the upper hole out to 1/8", but do NOT drill through the strap on the other side. If your Fly Baby is built stock, there's no solid wood between the face sheets of the spar (see the Rudder Post Assembly drawing above). Remove the strap, drill out the hole (carefully!) to 1/2", then cut a piece of 1/2" dowel to fit.
You're going to epoxy that dowel into the new hole, but first, go to the baby department of your local drug store. Buy one of the little plastic syringe-like devices they use to squirt medicine into babies' mouths. Cut the barrel down to 2" or so long, and, if possible, ream the outlet hole a bit bigger with a drill bit turned by hand.
Now, mix a good dose of your epoxy (For what it's worth, I used J-B Weld upon the recommendation of several knowledgable folks). Scrape some of the epoxy into the syringe barrel, then squirt it into the gap between the face sheets. Then cover your dowel with epoxy and slide it into the hole.
Let the epoxy cure overnight. Then slide the bracket on, hold it with two bolts on the lower holes, and drill out the upper bolt hole through the new oak dowel. Go all the way through to the strap this time.
Clean up the burrs on the bracket, paint it, install it, and reassemble the tail.
I made repairs to my aileron hinge bolt holes using epoxy for bushings as I was already at the largest screw size hole practical, alignment was critical and I didn't want to open up the boxsection unnecessarily. This may work for your tailpost bracket bolt holes as well...eliminating major disassembly. Paul (he used to be on this FB list) showed me this method, he uses this for his new construction advanced ultralites as it ensures exact fit without a lot of work and best of all it is self jigging. Apparently a similar method was used by the Russian Lavochkin factory producing the wooden Lagg fighters during WWII, they used Bakelite resin. Paul previously suggested this method for the wing wire attach bolt bushings, and I'm using a version of the method he described there for my wing wire/spar junction blocks to assure no bending to my bolts from worn holes.A simple way is to just fit the bolt in place, and fill the surrounding oversized hole with epoxy and tighten everything up. You can just goop in the epoxy and bolt it up wiping away the excess but I did it a little differently on my hinge screw holes. I used "Cold Cure" epoxy, a thin 24 hour epoxy by Industrial Formulations sold by Industrial Plastics and Paints. When I replaced my hinges I drilled a 5/32" sprue hole to intersect the centre of the oversized/worn bolt hole (drill at an angle from above so the glue may flow down hill, also allowing the air bubbles to escape). I cleaned out the sawdust and assembled the new hinges with new screws with a coating of cold cure on the screw and in the hole and aligned everything up. I then injected the Cold Cure into the 5/32" sprue hole with a fine tipped epoxy syringe. The Cold Cure epoxy flows fairly easily, and encapsulates the screw/bolt, which is why the intersecting 5/32" hole should be started from above the oversized bolt hole if possible, this way the air bubbles flow up and out. Don't worry too much about air bubbles, pop the larger ones and inject more epoxy in, if required add some cello tale to keep the glue in the 5/32" sprue hole when your done, but it should ideally run downslope. The Cold Cure glue pot life lasts for a couple of hours so you have plenty of time to add some more glue as the space around the bolt will soak up a lot of the glue as it settles in the empty space. I had to do this procedure twice, as the first gluing settled out pretty well and I didn't hang around to add more glue so by the time it cured the 5/32 sprue hole was empty, the second batch filled it all up permanently. If you want to easily remove screws later you may want to still insert a metal bushing but bolts break free from the epoxy fairly easily, especially with a bit of wax on them.
To save the syringe for next time drain out the majority of glue, let it cure and peel out the leftovers.
This method may not be for everyone, but it is permanent and self jigging saving on work :)

Comments? Contact Ron Wanttaja
.