A Radio-Controlled Fly Baby For Less than $40
June 2007
Back when I was a kid, I got into the U-Controlled gas-powered aircraft.
These were cheap, and I could build a new one out of a buck or so of balsa
wood and transfer my trusty Cox .049 to the front (or back, depending on
what I was up to).
What I REALLY wanted to do is get into those radio control models. THAT
was more like really flying.
But the cheapest plane back then cost $150 (for one that just had rudder
control), including the radio gear, and you'd have to buy a $50 engine
as well. That was absolutely a ton of money to me back then...about
a year's worth of my paper-route profit. Plus, the planes were made
of balsa and tissue paper. Hundreds of hours to build. One
false move, one rookie mistake, and POOF! It was all gone.
If the radio gear failed for some reason, you'd even get to watch your
expensive RC plane disappear to the far horizon, as the gas engine kept
running and running.
So for forty years, I dismissed the thought of flying Radio Controlled
airplanes.
And in that forty years, the sport changed tremendously. Electronics
have gotten much, much smaller and lighter. Battery technology has
produced lightweight high-power batteries than can be put to work spinning
electric motors to replace the cranky gas ones. The telecommunications
industry produces little tiny motors used for the "vibrating" modes of
phones and pagers. And the chemists have produced durable, flexible,
high-impact foam plastics for a variety of uses.
This has produced what the RC'ers call "Foamies": Tiny radio-controlled
aircraft that are dirt cheap, sold ready-to-fly, and almost impossible
to break. The prices run about $30, less on-sale. That's probably
close to what my old U-control models would cost to build, today.
That $30 includes everything...the aircraft, the motors, the transmitter,
the receiver, and the batteries onboard the aircraft. The only thing
you have to buy is the AA-cells for the transmitter.
The airplane batteries charge via a connector from the transmitter,
so you don't need a separate charger. The planes ONLY operate if
they're receiving a signal from the transmitter. If the plane goes
out of range, the motors automatically shut off and the plane glides down.
Probably the best example of the breed is the "Air Hogs Aero Aces."
You can find those at any toy store, and most of them fly pretty good,
once you get them balanced out.
These cheap RCs don't quite fly like conventional aircraft. There's
no aerodynamic controls...there are two motors mounted on the wings, and
your control system just adjusts the power to the motors. Throttle
full forward, the plane climbs. Stick right, and the left-side motor
turns faster and the plane turns. It doesn't let you do aerobatics
(at least not deliberately...) but it's easy to pick up how to fly them.
Even better, they're fairly slow...you can fly them in a large back yard.
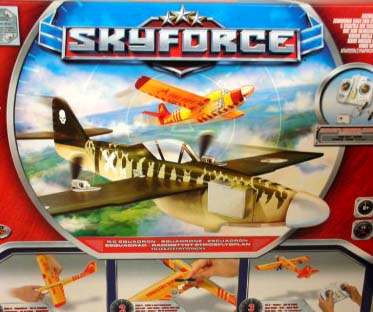 I bought a
few of these planes, then discovered the new Tyco "Sky Force" line of mini-RC
planes. The interesting thing about these is that the airplanes are
just profile designs (e.g., the fuselage is flat, not three-dimensional)
like my old U-control planes, and the airplane's RC gear is modular.
The receiver and battery are installed in a tiny plastic box that clips
into a special mount on the side of the airplane, and two sets of wires
lead to the motors, which clip onto special mounts on the wings.
The Sky Force sets include one set of RC gear and two airframes...and you
can quickly switch the receiver and motors to the other airframe as you
wish.
I bought a
few of these planes, then discovered the new Tyco "Sky Force" line of mini-RC
planes. The interesting thing about these is that the airplanes are
just profile designs (e.g., the fuselage is flat, not three-dimensional)
like my old U-control planes, and the airplane's RC gear is modular.
The receiver and battery are installed in a tiny plastic box that clips
into a special mount on the side of the airplane, and two sets of wires
lead to the motors, which clip onto special mounts on the wings.
The Sky Force sets include one set of RC gear and two airframes...and you
can quickly switch the receiver and motors to the other airframe as you
wish.
Which means that the system is ideal for making your OWN radio-controlled
airplane. Such as a Fly Baby!
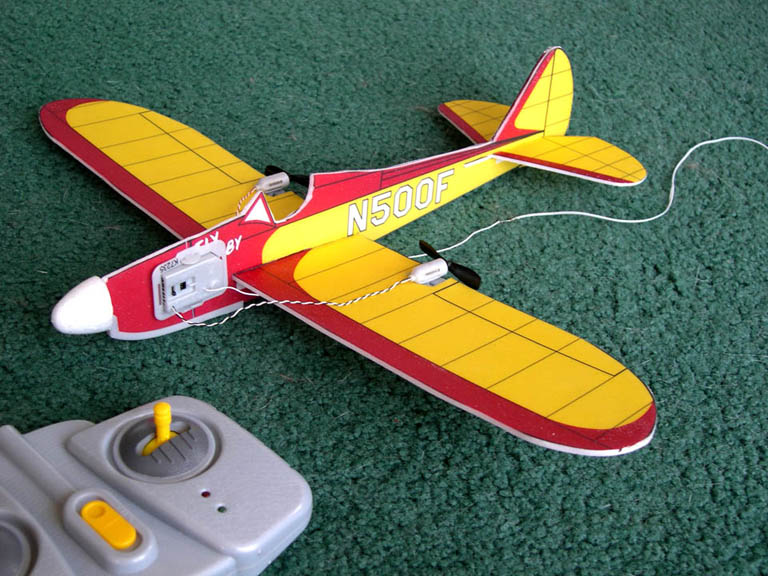
Which is, of course, exactly what I did. It's got a wingspan of
about 16 inches, and weighs a bit over an ounce, ready-to-fly (about 32
grams).
The Sky Force planes are made out of sheets of a plastic/foam called
Depron, and I made the Fly Baby out of a sheet of 3 mm Depron purchased
at a local hobby store. You could probably make the fuselage out
of 1/8 balsa and the wings out of 1/16, though going a 1/32" thinner for
both would be even better.
If you use the Depron, you'll need foam-safe superglue. This
is usually only available at the hobby stores, but it's also sold as "odorless
superglue" at other locations. The odorless is the key to the foam-safe
variety. If you use the balsa, the regular gel-type superglue will
be fine. I'm told that Elmer's glue works on the foam, too, but take
a while to dry.
First off, buy a Sky Force kit, assemble either the "Fire Rescue" or
"Biplane" airframes, install the radio gear, and get some flying practice
in. These planes are pretty durable, and you want to learn to fly
on something other than your Fly Baby. You'll eventually have to
cannibalize either the Fire Rescue or Biplane for receiver and engine-mounting
parts, so you might as well get some wear and tear on them.
Next, download the file the image below links to:
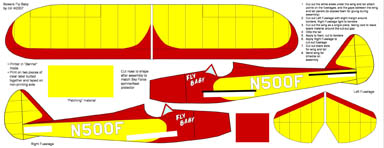
Right-click on it, and select "save". You'll get a file called
"Fly Baby SF.jpg". If you get
one with "_TH" after the "SF," you've accidentally grabbed the thumbnail
above.
The file contains the templates for all the Fly Baby parts. You'll
need an ink-jet printer than can print longer than a single sheet of paper
(e.g., has a "banner" mode). Butt two sheets of paper end-to-end,
tape them together on the back side, and run them through the printer in
the banner mode. I told my computer that I was using a custom 8.5"
x 22" paper size, and it printed it without a glitch. Biggest drawback
is that the ink is water-soluble...keep the plane out of puddles!
There's actually two ways you can do this. First, you can use
plain paper to just make templates to transfer to the Depron. Or,
pick up a pack of clear full-sheet label material from the local office
supply store. This material is fairly light, and lets you transfer
graphics to the plane (like the photo above) rather than just end up with
a blank white airplane. Instructions are on the sheet. Apply
the label material to the depron, then use it as patterns to cut
out the parts. The hardest part was applying the second side of the fuselage,
since I just had to kind of eyeball it in place.
Now you start cutting up one of the existing airplanes. Start
by removing the combination spinner/gray plastic keel protector from the
front of either the Fire Rescue or Biplane. Take them off as one
unit...these protect the front of the plane and provide stiffening for
the fuselage.
Cut the fuselage apart and remove the rectangular plastic ring for holding
the receiver. Place the fuselage flat on the tabletop, position the
receiver on the forward fuselage as shown in the photo above (actually,
set it a bit further forward, if you can...the stock plane has an aft CG
problem), and press gently on the fuselage. It will leave a bit of a dent
on the fuselage depron. Use an exacto knife to cut out the shape, then
trim it as necessary to get the receiver mounting ring to slip into the
fuselage. You'll need to cut additional notches out, top and bottom, for
the clips on the receiver box to mount top and bottom.
Take the old Sky Force fuselage you took the spinner/keep reinforcement
from, place it atop the Fly Baby fuselage, and trace out the shape needed
to fit the spinner/keel assembly. The assembly should press-fit to
the Depron; if it doesn't, use a bit of wide clear packing tape to hold
it in place.
Cut a 1/2" square notch from the trailing edge of the wings, just outboard
of the second rib line (see the photo). Cut the wing slot and horizontal
tail slot on the fuselage. Slide the wing into place, and bend it
up a bit to give it some dihedral. Apply glue..
While you're waiting, take the wing from your Sky Force plane.
You'll notice the engine mounts have tape reinforcing the attachment to
the wings. Take a pair of scissors and cut out the engine mounts,
INCLUDING the wing areas with the reinforcement. You aren't removing
the engine mounts from the wings, you are cutting away sections of the
wing itself. Cut away a bit extra wing...it helps.
If you are cutting up the Fire Rescue plane, the engine mounts go underneath
the same wing you cut them away from. Position them so that the slot
is approximately lined up with the trailing edge and parallel with it.
Apply that wide clear packing tape on the bottom to hold.
The Biplane actually installs the engines differently, so you'll have
to use the right mount on the left Fly Baby wing.
In both cases, the engine mounts are installed at what appears to be
a slant...there's the round part where the motor goes, and the narrow end
points towards the forward fuselage. See the original Sky Force wings
(you'll still have one uncut set left) for an example.
When all the glue is cured, install the receiver and motors (the motor
with the red-and-white wires goes on the right wing) and take it out for
a test glide. If it noses up and stalls, bend down the tailing edge
of the horizontal tail. You might have to add a little weight fore
or aft, depending on how your plane came out.
Then charge up the batteries and turn 'er loose.
Here's a video
showing mine flying.
There are two frequencies available in the Sky Force system (27 MHZ
and 49 MHZ) so you and a buddy can fly at the same time. You can
tell which you're getting by looking at the "altimeter" on the right side
of the box front.
One hint: The Sky Force system seems to suffer from some problems
with radio range. One way to help is to increase the length of the
receiver wire on the airplane. Strip a short bit of insulation off
the end, then solder on another piece of wire about the same length.
Find as fine a wire as you can...Radio Shack sells some #30 or #40 wire-wrap
wire, that works pretty good.
Ron Wanttaja
Comments? Contact Ron Wanttaja.
 Return
to The Stories Page
Return
to The Stories Page
