Updated November 2016
Update February 2021: QH Aviation now offers ready-to-use impedance matchers
So folks buy ICOMs, YAESUs, etc, buy the headset adaptors, and plug in their Flightcoms or David Clarks and launch into the blue.
Some of them aren't completely happy, though. If they fly in a noisy airplane, the radio may just not be loud enough. Maybe some brands of headsets won't work at all. They usually blame the handheld...after all, the headset works just fine when it's plugged into to their Narco or Garmin.
And, in truth, it *is* the handheld radio's fault. But the good news is, it can be easily fixed. For $5, if you've got a homebuilt that you can just modify, for ~$15 if you build a simple adaptor, or $30 if you want to adapt your current headset, or ~$150 if you want a brand-new headset perfect for your handheld radio.
I've written a lot on how to build one's own headset. This web page is different: I'll tell you how to get your existing headset to "play nice" with any handheld radio.
It's all a matter of amplitude.
Table of Contents
- Sound Science (How to define sound level)
- A Short History of Aviation Headsets
- The Problem with Handhelds
- How to Eliminate the Mismatch
- Replacing the Speakers in a Headset
- Using a Transformer as an Impedance Matcher
- Converting a Consumer-Grade Headphone
- Using Ear Buds
- Building Adaptors: A Practical Guide
- Buy, Not Build
- Feedback Squeal
Sound Science
So...when we're talking sound, what IS amplitude? Sound
consists of alternate waves of (slightly) compressed air and
(slightly) rarefied air. The amplitude of the sound is the
difference in pressure between the compressed and rarefied
potion of the cycles.We measure sound energy in "Decibels" (dB). The term is named after Alexander Graham Bell, who declared that "One Bell" represented the difference between a reference sound and one that seemed twice as loud. That's a fairly coarse unit, so engineers and scientists split it into tenths for Decibels. Decibels aren't a "level" themselves; they are a ratio between a level and a given reference.
Two things to remember: Decibels are logarithmic measurements of sound energy. Each "Bell" (ten decibels) represents TEN TIMES THE ENERGY. If a sound changes from 80 dB to 110 dB, there's a thousand times more energy involved (10^3 power).
It gets important even at lower differences. If you see a given sound rise 3dB, there's actually twice as much sound energy in the new signal.
This is important later when we compare the performance of some of our adaptors.
However, this brings us to the second point. This sound energy increase is not directly correlatable as to how the sound is perceived. That 3 dB difference might be barely noticeable to the human ear. But because its logarithmic, every step higher means a disproportionate increase in energy. You might not notice 3dB, but you're much more likely to notice 4 db, even more likely to notice 5 dB, and so on.
So when we look what's happening between your headset and your handheld, we'll be talking dBs.
History
Next, let's look at how headsets and handheld transceivers got developed.
When people are trying to develop a new product, do they
invent everything from scratch, or do they try to build on
existing hardware and technology?
The latter, of course. Companies scan the catalogs and
pick standard connectors, and other common electrical
components, and use them as much as they can to save from
having to design and manufacture them themselves.
The history of aircraft communications radios is
no different. The companies trying to develop them in
the '20s and '30s didn't want to invent the plugs, the
microphones, and the headphones. They went for parts
that were commonly-used, and were already being produced in
the hundreds of thousands.
And who was making microphones, headphones and plugs/jacks by the millions in the 1920s? Ma Bell, of course: The telephone industry.
Yes, the standards used for General Aviation
headsets today came from the telephone systems of the
1920s. You can probably take one of today's headsets and
plug it right in to those old switchboards.
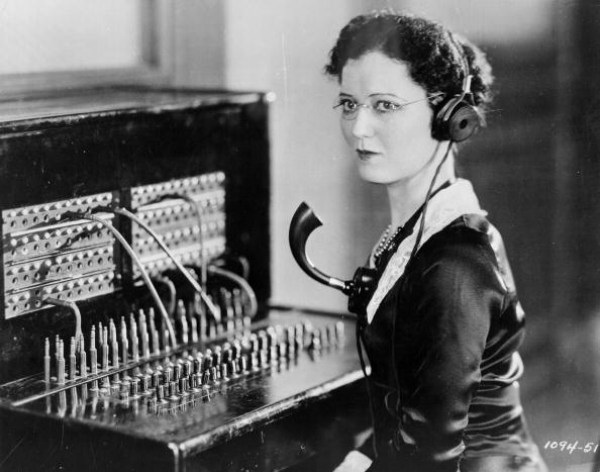
The headset the young lass is wearing in the above photo
contains two small speakers pressed against her ears.
The two speakers in the headset have an impedance of about 300
ohms and are connected in series. The characteristic
impedance of the phone system back then was 600 ohms, so the
headsets had to match. Larger speakers for home radios
might have a lower impedance, but the telephone speakers had
to stay higher.
("Impedance" is a fancy name for resistance. It's
actually NOT the same, since Impedance varies with the
frequency of the input, but just think of it as "Resistance"
to understand what's happening.)
GA first started going to radios in the 1920s, when there
weren't many consumer electronic devices. Radios used
headphones, and music lovers listened to their Victrolas,
which didn't HAVE any electronics.
But as the 20s and 30s rolled on, consumer electronics
skyrocketed. More and more devices used speakers, not
headphones. And it's more efficient if the speakers have
8-ohm impedance. By the 1940s, 8-ohm was the defacto
standard. It STILL is, from car stereos to IPhones.
The military eventually bit the bullet and converted to the
new 8 ohm standard.
General Aviation, to this day, hasn't changed. General
Aviation radios still expect to have 300 ohm speakers attached
to them. Plug in an 8-ohm speaker, and it's like
shorting the output. We are the last holdouts for
300-ohm speakers and, for that matter, the slightly-smaller
0.21" jacks used for microphones.
The Problem with Handhelds
Aviation handhelds have been around for a while, but were
pretty pricy. In the past 30 years or so, though, a
number of companies appeared that made small transceivers for
Hams, or police, or the military. With a slight
modification to change the frequency range, the modern
aviation handheld was born.
One problem: Most retained the 8-ohm
speakers/headphones that the rest of their production line
used.
The result: While it's easy to build and adaptor to
make the electrical hookups to an aviation headset,
the aviation headset produces an impedance mismatch.
You have a circuit that expects 8 ohms, but is confronted with
150 ohms (modern headset speakers are connected in
parallel). It's like when you hook a standard house
light bulb to a 6 volt battery instead of the 120 volts it
expects.
The modern electronics is game, though. Most radios
will produce SOME output in an aviation headset. Some
actually do pretty well.
How Does it Affect Performance?
OK, all the previous is basically engineering
gobbledygook. What does it really mean,
performance-wise?
I took a stab at measuring this. I set the output of an
ICOM handheld to 100 dB, as measured at an 8-ohm speaker using
a Radio Shack sound level meter. Then connected three
different aviation headsets to it and measured the sound level
at the headset cups. Here's the setup:
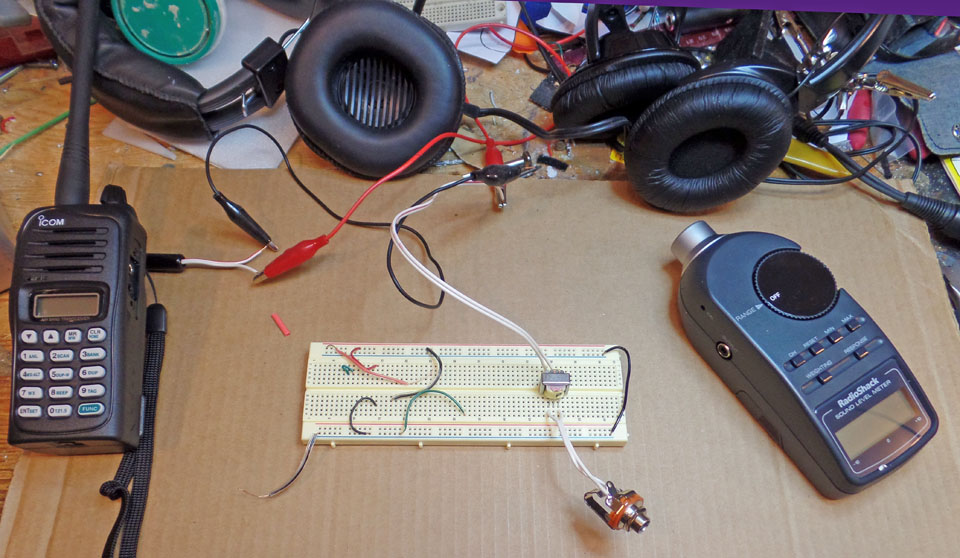
And, here's the results. Remember, the sound level
should have been 100 dB:
Headset #1: 89 dB
Headset #2: 94 dB
Headset #3: 92 dB
All at least 6 dB quieter than the reference sound
level. That's four times less sound energy! Note
that #1 was down 11 dB... a complete Bell, which meant the
perceived volume was less than half.
Any way you look at it, this is a serious decrease in
volume. Flying in a nice quiet closed-cockpit
airplane? Probably automatically just crank the volume
up a bit. But if you're in an antique, or open-cockpit
homebuilt, or an ultralight? It might make the
difference between a readable and a non-readable radio.
But I'm Using ICOM's (YAESU's etc.) Headset Adaptor!
I can't speak for every headset adaptor from every company,
but the one I bought from ICOM only provides the
physical and electrical connection from the miniature plug
that goes into the radio to the two jacks where the headset
plugs in. It does not do anything about the
impedance.
Many folks that buy these radios and adaptors intend the
radio for emergency use. They'd be fine for that, in
most GA aircraft.
Eliminating the Mismatch
Indeed, that 6 dB difference may not matter, if you're flying
a nice quiet Cirrus or Bonanza, or even a 172. But us
antique, classic, and open-cockpit guys need as much as we can
get. At cruise, my Fly Baby measures 105dB at chest
height. That's louder than a circular saw, and it's
running continuously. Even with a good headset with
passive attenuation, I need as much power to my ears as I can
get.
To fix things, we need match the impedance between the
headset and the radio. There are three different ways to
do this: Modify the headset so it's compatible with the
radio, insert a device in the circuit that handles the
impedance matching, or convert a consumer-grade headset.
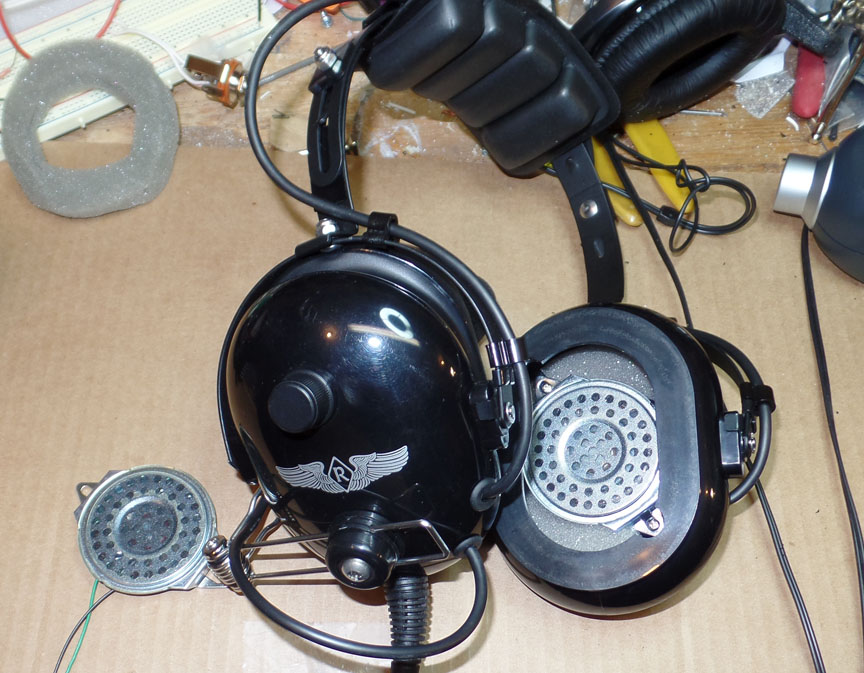
Replacing
the Speakers in a Headset
This is probably the easiest way to handle the problem:
Replace the speakers in your headset with 8 ohm speakers.
Rugged Radios
sells replacement speakers for their headsets in both 300 and
8 ohm. There's a small chance they'll fit your existing
headset, but Rugged sells a brand new aviation headset for
$100. Buy their headset, and replace the speakers ($15
each). Replacement is just a matter of removing the old
speakers and soldering the wires for the new ones.
However, this modification makes the headset unusable with a
standard aviation radio. You can do an adaptor, as I'll
describe in a bit, or buy a second headset exclusively for
using in handheld-equipped aircraft.
Since my Fly Baby has a handheld permanently
installed as a comm radio, I went this latter
route. The Rugged Radios RA200 Aviation Headset has good
passive attenuation and appears to be a nice, sturdy
unit. The modification works just fine in the air...good
strong volume, compared to what I was getting before.
One caution: If you have an ANL headset, do NOT replace
the speakers with 8 ohm units. There's electronics on
the headset itself, and the speaker change will mess it up.
Using a Transformer as an
Impedance Matcher
 You're probably familiar with transformers, that
can take 120 volts and drop it down to a lower voltage.
Transformers also work as impedance matchers, too.
You'll need one that has one side with an 8 ohm impedance, and
the other with 150 ohm impedance. These are usually
referred to as "audio output" transformers, since they're
designed to drive 8-ohm speakers.
You're probably familiar with transformers, that
can take 120 volts and drop it down to a lower voltage.
Transformers also work as impedance matchers, too.
You'll need one that has one side with an 8 ohm impedance, and
the other with 150 ohm impedance. These are usually
referred to as "audio output" transformers, since they're
designed to drive 8-ohm speakers.
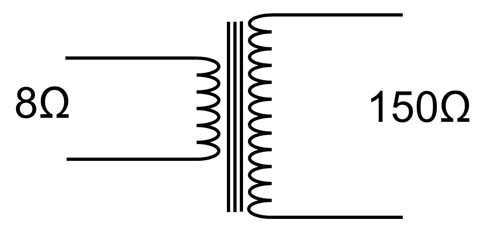
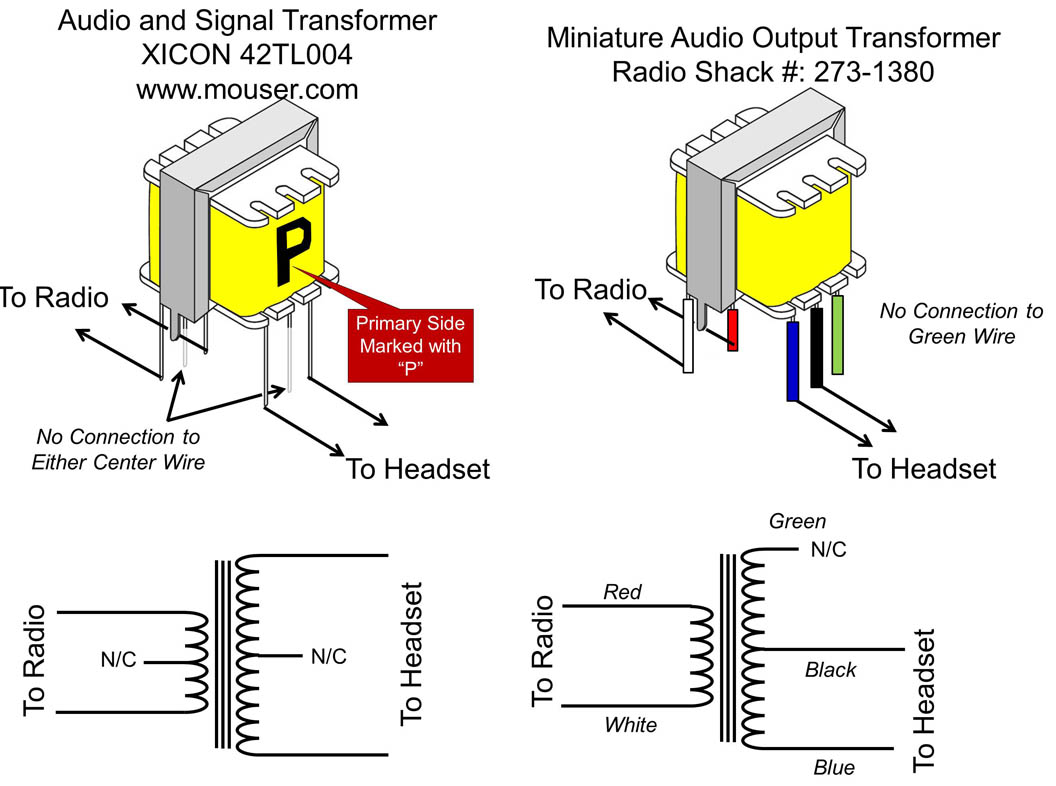
Transformers have two sets of windings, called the "Primary"
and the "Secondary". The Primary is usually the
side power is coming from, and the Secondary is usually
the output side. Primary and Secondary are just labels,
though...good thing, because we're basically reversing the way
the transformer is normally hooked up. Again, since
Primary and Secondary are just labels, it doesn't matter.
Circuit Schematic tradition always draws the secondary on the
right, so the illustration above shows how the 8 ohm input is
connected to the 150 ohm output. This would typically be
addressed at as a ratio: 150:8
Since consumer electronics often need to output to 8 ohm
speakers, it's easy finding transformers with 8-ohm
side. It's a bit tougher finding 150 ohms on the
other side. Fortunately, the actual impedance is not
that critical.
I tested three transformers... one at 200:8, the second at
250:8, and the third at 1000:8. This last transformer
had a center tap on the 1000 side. I had thought that
gave an effective ratio of 500:8, but it actually gives
250:8. Even better.
How'd they work? Nicely. With two of the headsets
and the same 100 dB reference sound level, all three brought
the signal level up to 98 dB or higher. You aren't going
to notice that 1-2 dB. On one of the transformers, on
one of the headsets, the level only got up to 96 dB.
Might be a bit noticeable, but the same transformer worked
fine on the other headsets.
Note that this is MINIMUM of a 6 dB increase. That's
four times the sound energy hitting your ears.
One of the transformers I tried cost about $20, but the other
two were $4 or less. These were the Radio Shack
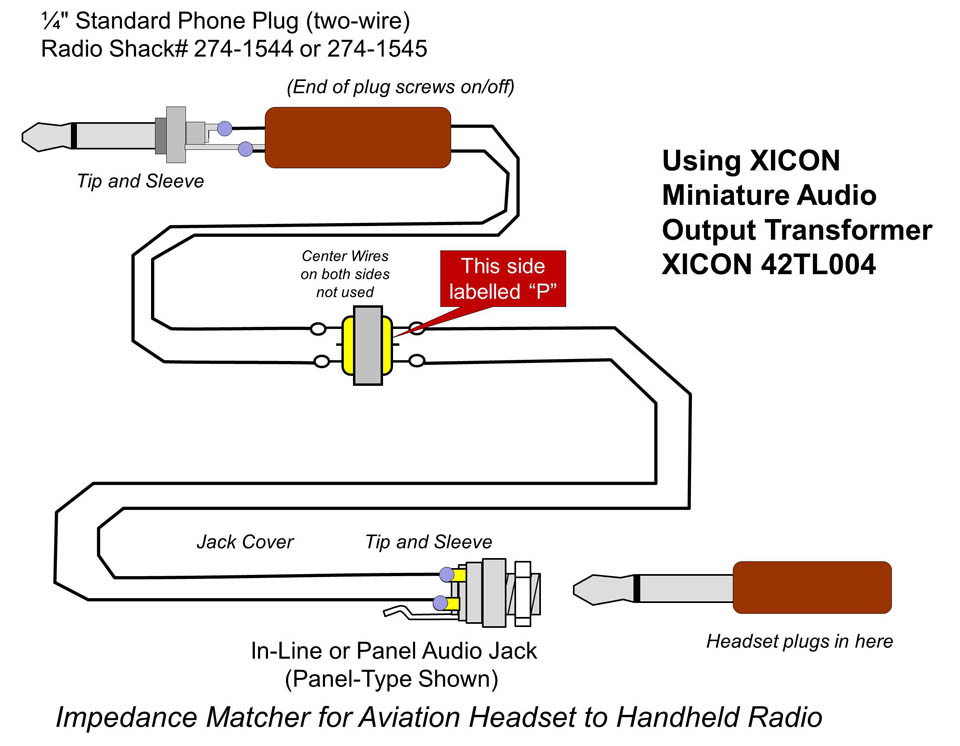
Miniature Audio Output Transformer (#273-1380) and the XICON
42TL004. I've used the Radio Shack transformer for
years, since they're available at most stores and
online. The XICON transformer can be ordered from Mouser
(www.mouser.com), Digikey (www.digikey.com) or any other
electronic parts house. The Radio Shack unit is probably
easier to get (just go to your local store) but the XICON
transformer is about half the size if you're trying to keep
your adaptor really small.
Installation is pretty straight-forward...the figure below
shows the connections that must be made. Options for
Installation:
1. If you've got a jack on the panel, you can install
the transformer between the output of the radio and the
panel-mounted jack
2. In an adaptor box that your headset plugs into and
then is plugged into the radio's output jack. More detail on
this option below.
3. Inside the headset itself (however, this does mean
the headset can't be used with a conventional aircraft radio
any more)
Making the adaptor is pretty easy. You can buy jacks,
plugs, and a small plastic box from Radio Shack. Or,
Radio Shack makes a 1/4" Y-Adaptor that comes with plug and
jacks. Cut off one leg, splice the transformer between
the remaining jack and plug.
Converting a Consumer Headphone
One option would be to NOT fiddle with the aviation headset, and use a standard set of consumer headphones in the airplane. I basically do this now, in the summer, by using Ear Buds. You have to come up with a microphone, boom, and holder, but I've got instructions for that.However, one bright idea I had: Consumer-grade headphones often include Automatic Noise Limiters, and they're often fairly cheap. Why not do an over-the-ear type consumer headset!
Bright idea...shot down by reality.
You see, General Aviation aircraft are much noisier than living rooms, dorm rooms, bus terminals, or even airliner cabins. We handle it by having our headsets include noise-absorbing material to reduce the outside energy that reaches the ear, and seals that minimize leaking. This is called Passive Attenuation. Consumer grade headphones have little passive attenuation; most just sit atop your ear and don't try to seal out external noise. They may have active noise limiting, true, but ANL works best if the majority of the noise it kept out before it tries to cancel it.
The exception to this is ear buds, especially buds like the Plugfone, which includes standard foam earplugs with passive attenuation. I fly my open-cockpit airplane with Plugfones in the summer. But when fall comes, I like the additional warmth that an over-the-ear headset provides. Either adapting a headset or building an adaptor is a better way to go.
Using Ear Buds
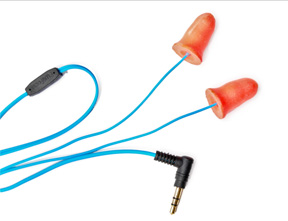 One type of Consumer headphone which is QUITE
practical with a handheld are ear buds...a pair of in-the-ear
speakers. I use these in the summer, along with a homemade
microphone boom, and the volume is very good.
They've got the standard 8-ohm impedance.
One type of Consumer headphone which is QUITE
practical with a handheld are ear buds...a pair of in-the-ear
speakers. I use these in the summer, along with a homemade
microphone boom, and the volume is very good.
They've got the standard 8-ohm impedance.I use a product called "Plugphones"; these are conventional foam earplugs with the speakers buried inside. A set costs $25 or so, I usually buy two at a time with some spare tips to get free shipping.
The advantage to these, vs. conventional ear plugs, is that they provide significant passive noise attenuation. Like the consumer headphones, consumer ear buds may not do as well for reducing the background noise.
However, there are ear buds sold with Active Noise Limiting (ANL). These are a quite attractive option, although the price is higher.
The only drawback to using ear buds is comfort. I, personally, don't like having things stuck in my ear. I tolerate it in the summer, since it's great to get rid of the "cans" over the ears. But for me, it gets irritating to have them stuck in my ears for more than an hour or so.
Also, for my fellow open-cockpit aviators, when cool weather comes it's kind of nice to have a big headset over the ears to keep them warm.
You could wear the ear buds under a conventional headset, of course (not plugging the headset into the audio). Or you could build a stand-alone microphone system and free yourself entirely from the conventional headset world.
Building Adaptors: A Practical Guide
Using Ear Buds is a pretty good option, but for most of us, the easiest way to do this is to build a small adaptor. It plugs into the headphone jack on the radio, and the headset plugs into it. It lets you use your aviation headset on either type of radio setup (assuming you remember to bring the adaptor!).As part of my experimentation, I've bought a lot of parts...so I'm experimenting with different types of adaptors. This section will be updated periodically to note my progress.
Parts
There are three major components you'll need: A transformer to match the impedance (see above), a 1/4" phone plug, and a 1/4" phone jack, either a panel-mount or an inline jack.The plug is a common Radio Shack part. You can buy 274-1544, the monaural plug, or 274-1545, the stereo plug. Here's a diagram:
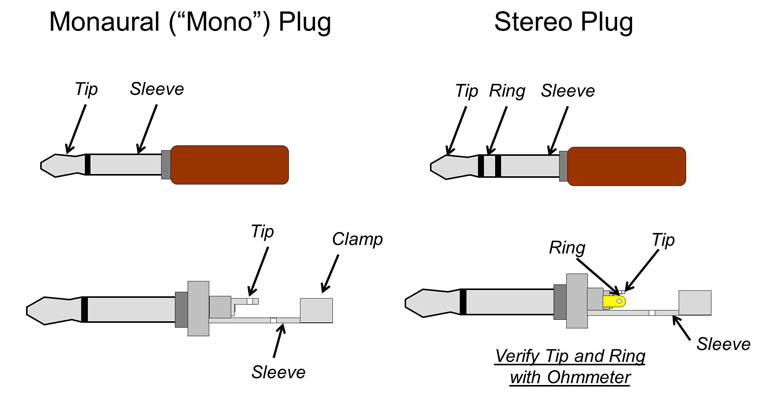
You'll see an item labeled "clamp" that's part of the Sleeve collection. This is usually a circle of metal with a gap along the edge. When you get done with your soldering, route the wires through the "Clamp" and mash down with a pair of pliers to hold the wires securely. That way, the solder connections aren't stressed if you pull on the cable instead of the plug body (naughty, naughty, naughty).
Similarly, the Phone jacks come in Mono and Stereo, but in two basic flavors: Panel-Mount, and Inline. You'll use the panel-mount if you're installing the transformer into a small enclosure or building it into your instrument panel. You'll use the In-Line Jack when you're just going to install the transformer along the cable itself without a hard-shell enclosure (more in a bit).
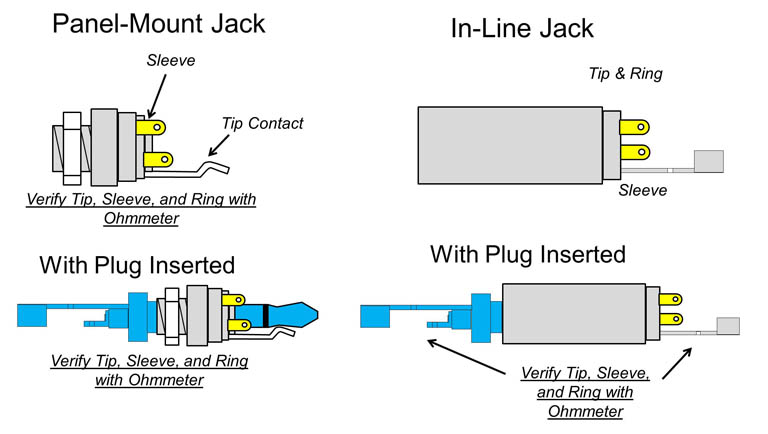
Jacks can be mono or stereo, like the plugs, and, again, don't connect the "Ring" connection.
Jacks, especially the panel-mount type, sometimes include a switch mechanism that make them even more confusing. It's what's needed when an external speaker must be disconnected to use a headset, but you probably aren't going to be doing this. It's simpler to buy a jack without the extra switch stuff, but if it's all that's available, just insert the plug and verify the connections like normal.
Both Jacks and Plugs come with solder-type or screw-in terminals. I personally prefer the solder type, but to each his own. Keep in mind you will have to do some soldering....
Tools
Basic tools you'll need are a soldering iron and rosin-core (electrical) solder. I like to use a pencil-type iron with a skinny tip, but if you're careful, a big gun-type will work.You'll need a bit of wire, of course, depending on what style adaptor you make. Doesn't have to be heavy... 22 gauge, even 26 gauge is plenty. Shielded would be nice to have. Personally, I've been cutting up spare stereo cables...the kind with the RCA plugs on either end.
Schematics
OK, here the basic schematics you'll need, for both the Radio Shack and the XICON transformers. Note I show the Radio Shack schematic with an in-line jack and the XICON one with a panel-mount jack. Either one can be used with either transformer.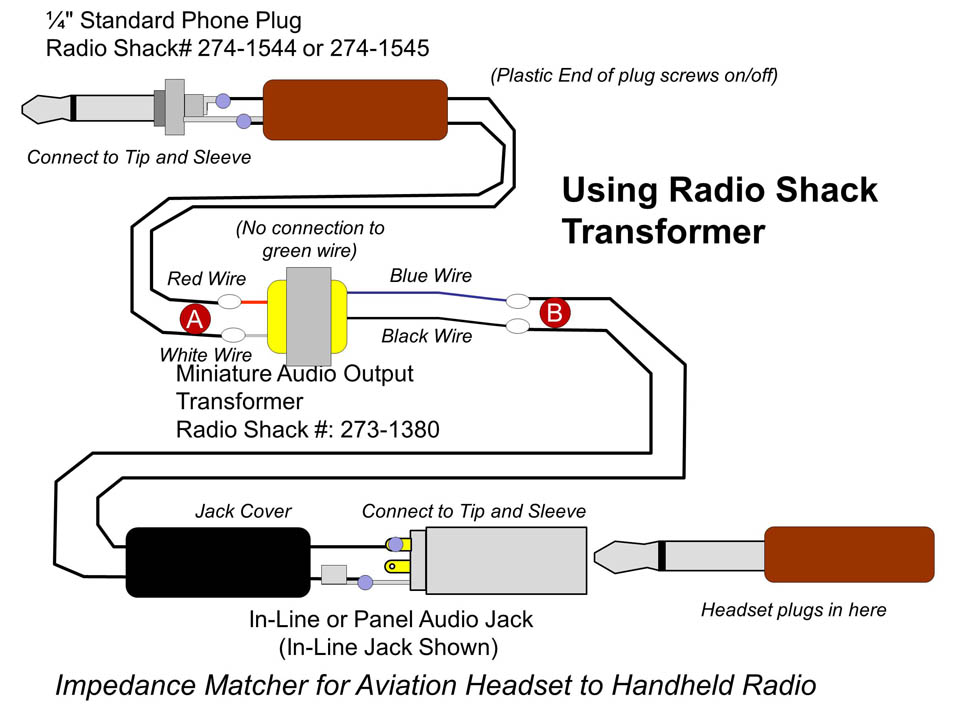
Implementation
OK, let's look at some ways one can build the
adaptor.
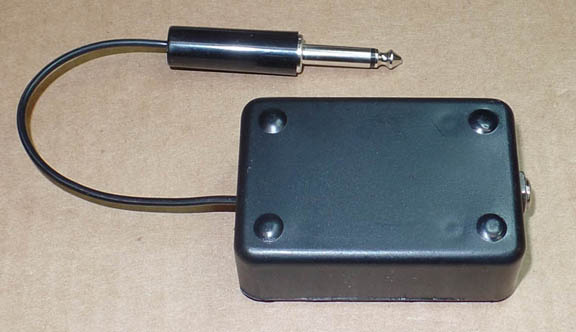
Component Box
Here's the easiest.... putting a panel-mount jack and
the transformer inside a small "Project" box.
Radio Shack and Fry's sells small boxes like this, but
just a random plastic box sitting around will work as
well.
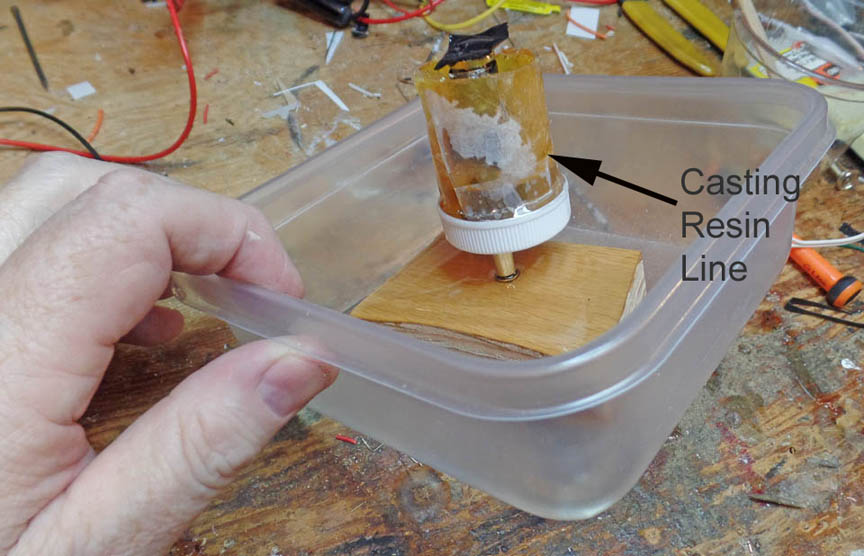
Molded One-Piece Adaptor
This is one I was real eager to try: Use a
mold and casting resin to make a single-piece
adaptor. If you use the smaller XICON
transformer, it can all be sized to fit in a pill
bottle.
Here's the plug and an in-line adaptor
"Siamese-Twinned" so that they overlap each other
by a considerable extent. A single wire is
wrapped around the body of the in-line jack (which
is electrically connected to the sleeve),

Next, cover the whole thing with shrink tubing to hold all the goodies as tight as possible. Note the piece of tape over the mouth of the jack to keep the resin from accidentally pouring inside. Also, I used Super Glue to seal the tabs at the other end to prevent resin entry. It's just a slight gap, but I was concerned that the casting resin might make it in.


The cap was the most awkward part of the process. The regular cap has a molded insert fitted inside to seal the bottle solidly. I'd tried this with the insert a few years back, but its molded shape didn't let the plug seat properly in the jack. So I pulled out the insert.
The problem is: Without the insert, the pill bottle doesn't seal very well. I tightened it up as well as I could, added a bit of tape, and decided to try my luck. I bought casting resin from the local hobby store. Also important was the Mold Release Spray. I pulled out the adaptor, sprayed the inside of the mold, and put things back together again.
Sadly, the pill bottle, with the seal removed, didn;'t hold resin worth a darn. I filled the pill bottle...and it started oozing out, around the white cap. It went everywhere, flowing down to the wooden base, coating the steel shaft of the plug. Figured it was a goner anyway, and since I'd mixed up too much resin, I just kept topping it off. Finally knocked off for the night.
This is what it looked like the next day. The leaks finally *did* seal, but the pill bottle had only filled up halfway. The plug appeared sealed to the wooden base.
Oh, well. It's sealed now. The casting resin is cheap, so I mixed up some more and filled the pill bottle again.
Came back two days later. Surprisingly, a bit of tugging got the plug to disconnect from the wooden stand. The casting resin hadn't stuck to the steel of the plug (fortunately, since I hadn't used mold release on it!). It took some real cranking, but I managed to separate the pill bottle from the adaptor.
And lo and behold...it turned out pretty well! I pulled the tape off the mouth of the jack, and stuck in a spare plug to verify the jack was open. Success!

But....
Turns out it wouldn't work with my ANL headset, due to the way I'd wired up the adaptor. Also, the diameter of the molded plug was a big big for my airplane...both the mike and headphones jacks would fit, but the ANL control box wouldn't fit in its usual spot. I didn't want to leave it dangling.
So if you try this on your airplane,
A) Test it electrically with the headset you're going to use BEFORE casting,
B) Come up with a way to seal the cap to the bottle. Next time, I may just RTV it together since one has to practically cut it apart anyway.
C) Make sure it'll fit where you want to put it. Remember, you can always test it in the pill bottle BEFORE you pour the resin!
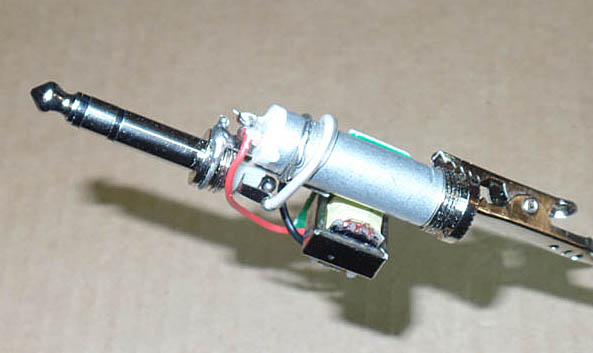
A Simple In-Line Adaptor
 If you take another
look at the Schematics above, building a simple
in-line adaptor looks pretty easy. Start
with a plug, connect it to a transformer, and
then the output of the transformer to an in-line
jack.
If you take another
look at the Schematics above, building a simple
in-line adaptor looks pretty easy. Start
with a plug, connect it to a transformer, and
then the output of the transformer to an in-line
jack.Electrically, it's a good solution. Mechanically, though, it has some issues. Careful as one might be, short lengths of cable (like the adaptor) are subject to some abuse, and some tension. The itty bitty wires connected to the transformer couldn't take much of that. The design has to include some way to prevent tension on the cable from affecting the smaller wires.
Early in October 2016, Mr. Gerry Visel came across an earlier version of this web page. He, too, had volume issues with his handheld. So he built and adaptor, and it really did the trick.
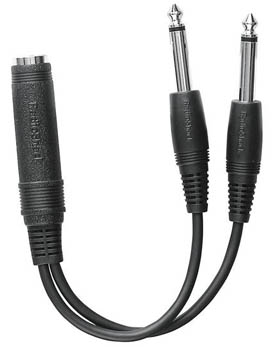
Gerry had built an inline adaptor, and his design was ingenious. Rather than buying separate jacks and plugs, he bought a Radio Shack "7-Inch Microphone Y-Cable", Part # 4202156. This has one 1/4" mono jack and two 1/4" mono plugs. One can cut one of the wires in the center to install the transformer, and cut the extra plug off on the other side. The "useless" cable to the cut-off plug can be used for mechanical reinforcement of the side with the transformer.
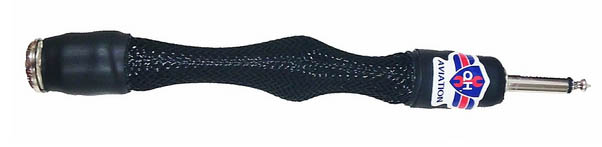
Buy, Not Build
QH
Aviation Services now offers a completely
assembled adaptor, offering a significant
improvement in headset volume. Cost is $75
They also offer headset repair services, and build custom headsets. You can even get an 8-ohm set made.
Feedback Squeal
When I first used this adaptor with a standard
aviation headset, I got a squeal in the headphones
when I transmitted.
It appears there was some sort of acoustic coupling
between the headset microphone and the
headphones. Not sure why this happened on the
handheld radio with the adaptor vs. a standard
aircraft radio without an adaptor.
But the solution was pretty simple: I reduced
the "sidetone" volume. "Sidetone" is when you
hear your own voice when you transmit. Most, if
not all, handhelds should have an adjustment for
this. Here's the instructions for my Icom ICA5
(and I'm betting most radios work this way).
1. Select an unused frequency
2. Turn the volume down a bit so the squeal
won't hurt.
3. Press the Push-to-Talk switch to transmit
4. WHILE transmitting, adjust the volume down.
At some point, the squeal will stop, and you will
still be able to hear yourself talk (albeit at a lower
volume level).
