[RJW Note: Drew posted this to the
mailing list and Facebook page. See his original step-by-step article
for the technical details. The rest of this
article is all Drew's.]
Since restoring my Fly Baby and painting it with latex coatings over 10 years ago, I figure it’s time for a long term update…
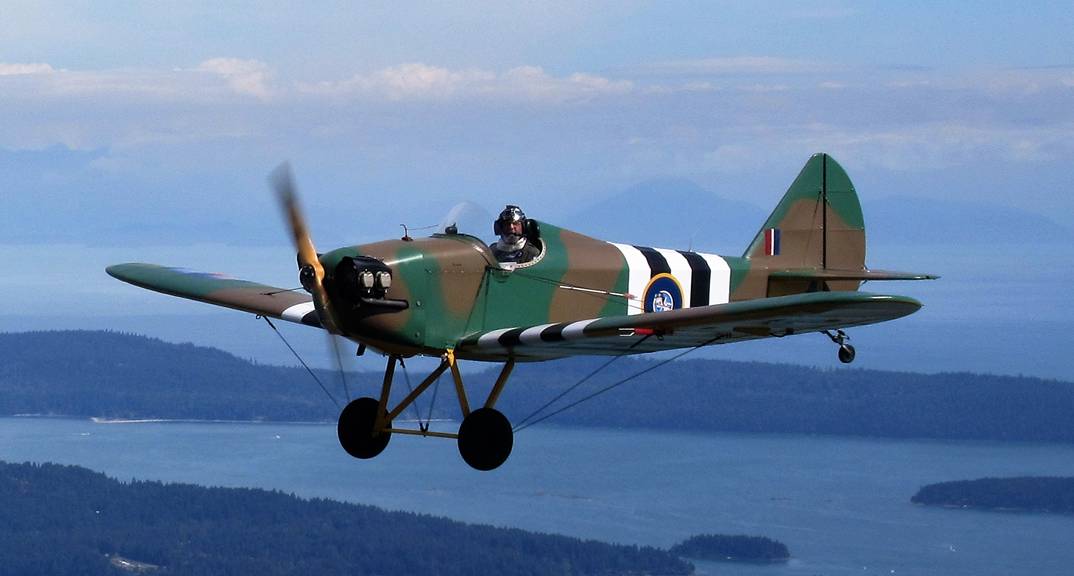
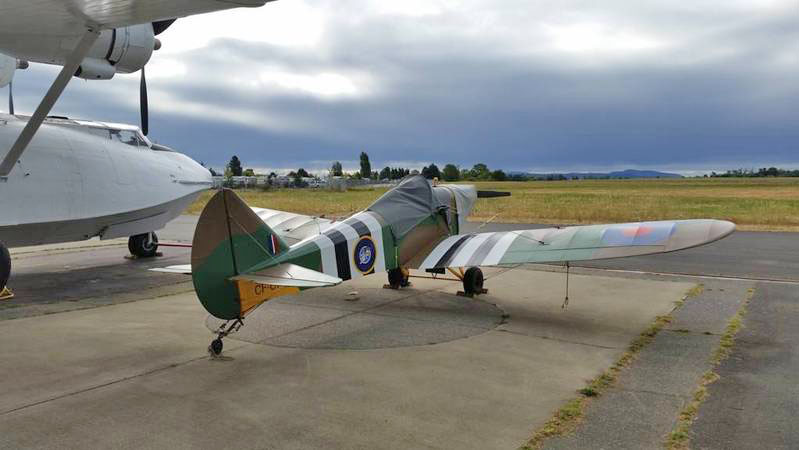
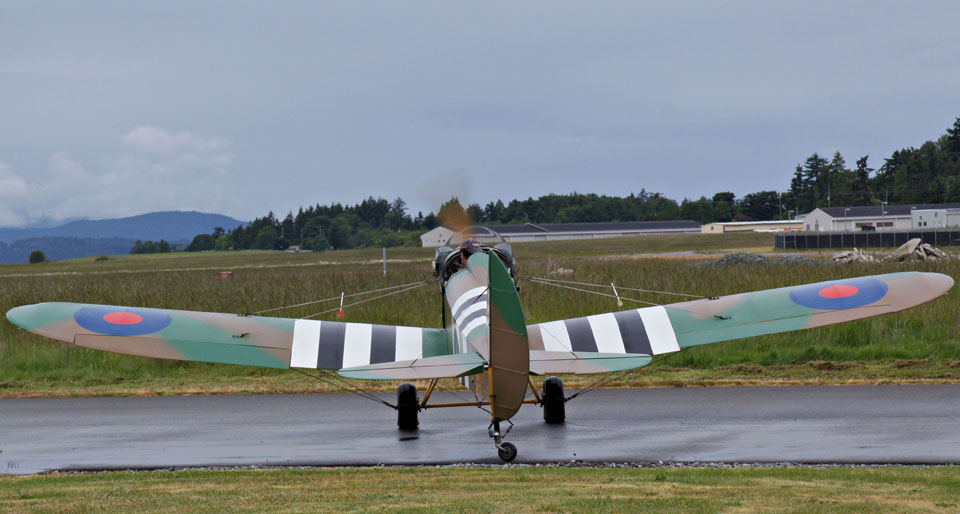
Photo of Drew's Plane taken in the summer of 2016, ten years after painting with latex
LATEX PAINT DURABILITY
NOTE: “latex” house paint doesn’t actually contain latex, and it
is known as “emulsion” paint in other areas of the world.
These paints are frequently advertised to contain various forms
of acrylic binders.
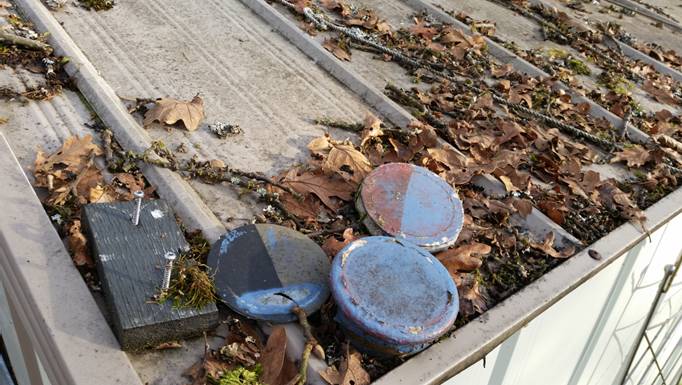
When experimenting prior to applying latex house paint on my FlyBaby, I have left my latex paint covered fabric sample patches out in my garden exposed to the elements for approximately 15 years now. They have been abandoned and exposed to the weather sitting on convenient surface such as fence posts and shed tops exposed to the elements, sometimes lost in the garden for months at a time. They have never been cleaned and are looking weathered now… but with the exception of one area of raw fabric where I had stripped the latex paint away in one of early xylene stripper experiments, all of the samples are still sound.
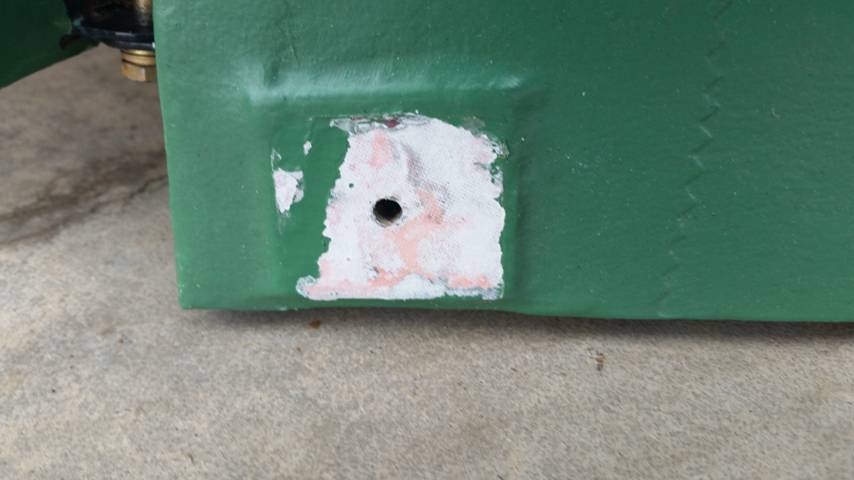
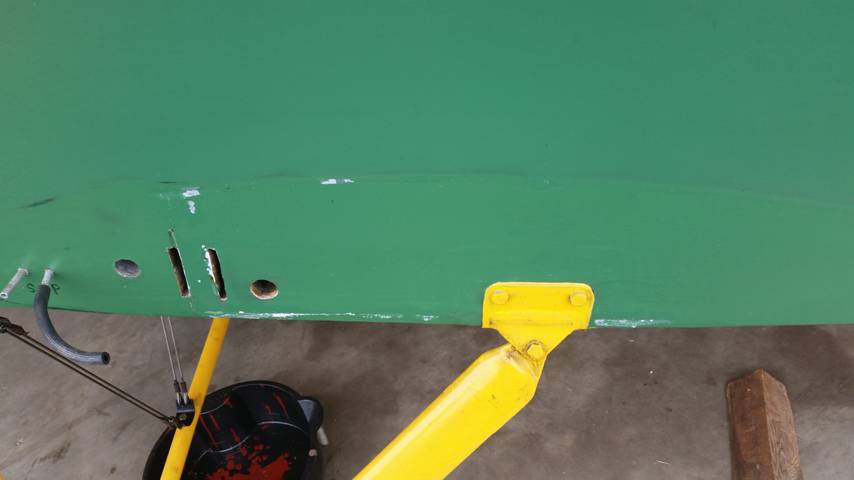
The following two pictures show where latex has pulled way from the fabric after removing mating surface which was in compression to it.
TOUCH UPS
While my paint has endured my use and abuse remarkably well, pin
size chips appear from time to time. Some touch ups have
been required from my own stupidity and abuse. I take care
of my FlyBaby… but I don’t baby it. When a touch-up has
been necessary, I normally use a foamy brush or small natural
fibre artist paint brush. My paint is that left over from
the original project, stored in tightly sealed cans and jars and
checked every year or so. I keep a stock of this paint in
small “ready use” glass babyfood jars handy for touch-ups.
The touch-ups are normally applied after a quick cleaning with
no further surface prep necessary. Normally only one coat
is required, but a hair dryer can help accelerate drying if a
second dab of paint is desired. Cleanup of brushes is
normally done in the washroom sink, although I’ve used a
convenient puddle in a pinch. Touch ups normally blend well with
the surrounding paint once dried. They are hard to spot,
and more often than not the touch-up is noticed from a variation
in texture, not colour. Playing with different brushes or
paint viscosity can minimize touch-up texture variation… but
this hasn’t been an issue or concern on my camouflaged airframe
(apparently some folks buff and polish their latex surfaces... I
don’t bother).
I found that if I used ArmourAll too frequently or liberally in application that the latex will become too soft, especially in warm weather. When tied down outdoors I would ArmourAll the more exposed surfaces monthly for a bit of UV protection and better water resistance. When the latex coated surfaces get wet, they darken, but lighten again when dry. Fuel can leave a mark on the latex, but cleaning with soap and water, followed by an wipe of ArmourAll cleans it up fine.
I have also used Pledge spray polish furniture wax to seal and weatherproof my fabric. I works great as a glass cleaner too, and gives the plane a wet look and smells lemony fresh.
I have to avoid getting any ArmorAll or Pledge on my wing walks as it is too slippery.
I would not consider latex coatings suitable for a machine that was a high value (zero-time Cub clone, anything 4-seater); where it would spend more than a week or two at a time outdoors; anything high speed, high wing loading, or aerobatic (without further testing); severe duty service such as the tropics or arctic conditions; nor on a certified aircraft.
Drew Fidoe
Since restoring my Fly Baby and painting it with latex coatings over 10 years ago, I figure it’s time for a long term update…
Photo of Drew's Plane taken in the summer of 2016, ten years after painting with latex
OVERVIEW
I had painted my Fly Baby airframe with latex paint after researching and experimenting with assorted paint samples and types. My thinking at the time was to hopefully save a bit of money as well as enjoy the challenge and spirit of the old-school EAA experimenter… as well as avoid the hazards, precautions and clean-up hassles of working with established aviation paint systems in use at the time. In the end I used certified type adhesives and coatings when applying the fabric to my fuselage and control surfaces, as well as repairing my wing fabric which was in butyrate doped dacron. These certified covering products were excellent but expensive for my budget at the time. After using the certified products, I definitely wanted to work with a less toxic median. I was restoring an elderly damaged airframe and hoped to get 10 years of service out of the coating. I reasoned at the time that if it didn’t weather well that I could always top-paint it with an automotive enamel. 10 years have literally flown by, and I have been pleasantly surprised with the results. My Fly Baby airframe is now 50 years old and going strong.LATEX PAINT DURABILITY
NOTE: “latex” house paint doesn’t actually contain latex, and it
is known as “emulsion” paint in other areas of the world.
These paints are frequently advertised to contain various forms
of acrylic binders.When experimenting prior to applying latex house paint on my FlyBaby, I have left my latex paint covered fabric sample patches out in my garden exposed to the elements for approximately 15 years now. They have been abandoned and exposed to the weather sitting on convenient surface such as fence posts and shed tops exposed to the elements, sometimes lost in the garden for months at a time. They have never been cleaned and are looking weathered now… but with the exception of one area of raw fabric where I had stripped the latex paint away in one of early xylene stripper experiments, all of the samples are still sound.
As for the airframe itself, I have been
fortunate to have it stored in an enclosed hangar with the
exception of this summer when it was tied down
outdoors. While indoors, Stringbag has been in a
shared very close quarters with other aircraft and has
experienced regular handling. In operation, I’ve had the
belly slathered in engine oil. I’ve spilled gasoline across
the nose when fuelling, bumped, dropped and banged things
against it during maintenance, bumped wingtips in ground
handling etc. It’s always cleaned up well, and if
paint inadvertently got nicked or scraped, it has always
been minor and easily touched up when deemed
necessary. Outdoors, it was subject to the elements of
an unusual Pacific Northwest summer which included
unseasonably hot days interspersed with high winds and
torrential rain storms. Overall, I have enjoyed the
use of the plane and treated it more as a workhorse than a
prized pony. My paint job has proven, in *my*
application, to be surprisingly durable and economical… and
it still looks great.
Lessons Learned
Below is an outline of a few lessons learned, as well as some more thoughts from my experience using the latex paint on my plane:DURABILITY and ADHESION
Adhesion of my latex paint over top of Polybrush, butyrate dope, and raw fabric have all been equally satisfactory. I used Semigloss and satin finishes for easier clean-up and a classic look, but if adhesion is a major concern, during my early experiments I determined flat finishes seemed to have the best bond, with flat finishes having the most durable surface. My semigloss latex is softer than enamel and can take heavy abuse on the unsupported fabric surfaces. Wood backed surfaces can chip or scuff if given a hard enough hit…. but the same abuse to a metal aircraft’s surface would likely result in a scratch or dent. While the latex paint can scuff a bit easier than enamel, it can be buffed out or easily retouched if necessary. Latex surfaces in firm compression contact with another surface (such as wing root against fuselage, or tail bracket to horizontal stabilizer) tend to have the latex pull away from the fabric surface on disassembly. I haven’t found it to be an issue, I just touch up the surface with more latex.The following two pictures show where latex has pulled way from the fabric after removing mating surface which was in compression to it.
FINISH
As my latex has aged over time, slight brush and roll marks can barely be seen on the surfaces if you look for them, but it is not unsightly. It is not a polyurethane wet-look. My finish is more of a pleasant “satin” look, especially after ArmourAll treatment. Rolled on surfaces maintain a better gloss than my sprayed on surfaces.TOUCH UPS
While my paint has endured my use and abuse remarkably well, pin
size chips appear from time to time. Some touch ups have
been required from my own stupidity and abuse. I take care
of my FlyBaby… but I don’t baby it. When a touch-up has
been necessary, I normally use a foamy brush or small natural
fibre artist paint brush. My paint is that left over from
the original project, stored in tightly sealed cans and jars and
checked every year or so. I keep a stock of this paint in
small “ready use” glass babyfood jars handy for touch-ups.
The touch-ups are normally applied after a quick cleaning with
no further surface prep necessary. Normally only one coat
is required, but a hair dryer can help accelerate drying if a
second dab of paint is desired. Cleanup of brushes is
normally done in the washroom sink, although I’ve used a
convenient puddle in a pinch. Touch ups normally blend well with
the surrounding paint once dried. They are hard to spot,
and more often than not the touch-up is noticed from a variation
in texture, not colour. Playing with different brushes or
paint viscosity can minimize touch-up texture variation… but
this hasn’t been an issue or concern on my camouflaged airframe
(apparently some folks buff and polish their latex surfaces... I
don’t bother). CLEANING
As my FlyBaby is normally hangared, I tend to only give the plane a thorough wash once or twice a year. The rest of the time I usually just dust or spot clean as necessary. For cleaning, nowadays I use a spray bottle filled with automotive windshield washer fluid, it works great with a soft cloth and is cheap. I will top that off with a wipe of ArmorAll protectant if required (I think the STP sells a similar product in the USA). The satin and semigloss finishes scrub quite well, although my white bands on “invasion stripes” tend to require a bit more attention. I normally apply ArmourAll protectant twice a year, normally after washing the plane. This seems to keep the paint flexible and is according to the product advertising is supposed to give a bit of UV protection too. I polish/clean my enamel roundels and markings which were painted over top of the latex with ArmourAll every 3 or 4 months, or as necessary if it starts to feel crackly to the touch. The enamel that I used is hardware store quality Tremclad brand paint (Rustoleum is US version). The only enamel that is failing is on my tail fin flash where I had used white Tremclad spray paint. All enamel applied over latex by brush had adhered perfectly with no chips nor peels. The yellow underbelly fabric has held up very well to liberal treatments of engine oil, but exhaust soot tends to stain the surface.I found that if I used ArmourAll too frequently or liberally in application that the latex will become too soft, especially in warm weather. When tied down outdoors I would ArmourAll the more exposed surfaces monthly for a bit of UV protection and better water resistance. When the latex coated surfaces get wet, they darken, but lighten again when dry. Fuel can leave a mark on the latex, but cleaning with soap and water, followed by an wipe of ArmourAll cleans it up fine.
I have also used Pledge spray polish furniture wax to seal and weatherproof my fabric. I works great as a glass cleaner too, and gives the plane a wet look and smells lemony fresh.
I have to avoid getting any ArmorAll or Pledge on my wing walks as it is too slippery.
LATEX on METAL
I painted my camouflaged plane’s metal and fibreglass cowlings with latex, using alkyd enamel house paint as an undercoat. While it has held up very well, after 10 years service this latex surface is starting to show some crazing and checking. I used colour-matched enamel for my landing gear, lower cowlings and belly pan, which have held up well and clean easily. Others have perfected the application of latex paint directly on aluminium surfaces since I painted my FlyBaby.COATING THICKNESS
Areas where I spray painted my latex using a $20 toy plastic airgun were very light and thin... but have an excellent bond. Spayed areas were thinner coats and flatter finish than brushed or rolled on applications. Areas such as my wing walk wore through and required touch ups. Heavier latex applications using foam rollers and brushes have held up well too. Regardless of latex thickness, I’ve not experienced any rigworm or similar defects.LATEX ADDITIVES
As an update to my old latex postings, the only additive that I now recommend for latex is windshield washer fluid. The cheap stuff (without additives such as Teflon). WW fluid allows good flow and unique drying characteristics, makes a great thinner for spraying as well as for cleanup. It has worked very well for me.OUTDOOR STORAGE
I only stored my plane outdoors for six weeks. The paint held up fine, but I did spend a lot more attention to keeping it clean. In my case my maintenance easily trebled, as my exposed hardware suddenly required extra corrosion protection; also, humidity related electrical issues appeared. Set-up and prep for flying, and rigging/staking afterwards took considerable time as well. I think that it would take no more time and effort to fold the wings and store the plane under cover rather than park it outdoors. Sun damage and fading could be expected with extended outdoor storage. Cockpit and engine required covering as well as the wooden propeller. I would expect weather fading and shortend life of the coating if kept out doors... at least for aesthetic reasons. I wouldn’t recommend storing any wooden airframe outdoors, but if one did intend to keep a FlyBaby outdoors on a regular or extended basis... I would recommend against using latex paint.EVOLUTION
With product technology advances and experimenter evolution, folks have built upon my ideas as I have on those before me. When deciding to go the latex paint route, please use discretion and do your own homework!SAFETY
Please note that on my project that I followed aviation practices and used aviation quality products for installation of my fabrics, tapes, cords, adhesives and rib stitching of my fabric to my airframe.RECOMMENDATIONS
Would I do this again? I depends on the airframe and intended use. For an ultralight such as a Minimax... definitely. For a small homebuilt such as a Fly Baby or Pietenpol class… probably yes. Considerations here are the value of your airframe (new build?); the cost of your covering materials (which can be very expensive if you are not a good scrounger); and potential resale value of your plane.I would not consider latex coatings suitable for a machine that was a high value (zero-time Cub clone, anything 4-seater); where it would spend more than a week or two at a time outdoors; anything high speed, high wing loading, or aerobatic (without further testing); severe duty service such as the tropics or arctic conditions; nor on a certified aircraft.
CONCLUSION
There are some excellent tried and proven covering systems on the market, including some exciting newer water-based and heat activated/adhesive products. While expensive, most are proven and durable if you follow the manufacturer’s directions. That being said, latex coatings worked out well for me. I really enjoyed the low cost, ease of application, easy correction of mistakes (roll the part outside while still wet and hose the latex off!). No expensive application tools/equipment was required, nor special personal protective gear. Ease of application and low cost of the paint allowed me to be artistic with a multicolour paint job. Fume free application permitted safe painting of parts in a heated basement of my home at my convenience. It’s been surprising durable and still looks great. I have been happy with my efforts.Drew Fidoe
