The site that has that image,
Vernco.com,
provides
a detailed guide to how to tell whether your generator has an
internally or externally grounded field...and a bunch of good
other
information as well.
My Fly Baby's C-85 mounts a Delco-Remy generator with an
externally-grounded
field. The Delco
generator
service
manual discusses both types (it refers to the
internally-grounded type as having a "bucking field coil."), but
says
the externally-grounded one
"...is used in a wide variety of applications having low to
moderate
current output requirements." Sounds like the
typical
C-85-12.
Since I have an externally-grounded generator, I'm only going to
address those types. If you've got a C-85-12E like me,
it's
probably a good guess you have the same type. But it's
your call.
Why Were the Regulators Different?
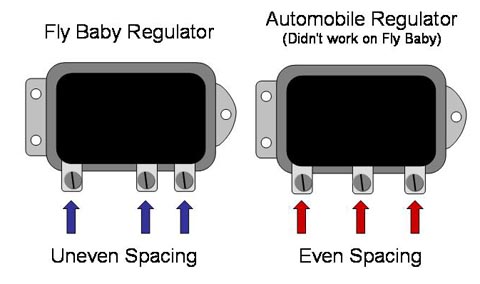
If you read the tale of my earlier
generator woes,
you'll see that I bought a new regulator at an auto supply
store, but
it didn't work. Eventually, I noticed that the spacing of
the
terminals were different, as shown by the drawing on the right.
Why didn't it work? Didn't know at the time. I had
taken
the old Fly Baby regulator to the auto repair shop, and they'd
announced it was bad. The new one tested out OK, but
refused to
work on the airplane when I finally got the generator running.
I shrugged it off, back then...after all, my system was back
working
again.
This time around, I wanted the answer. A bit of
digging
online, and I found a neat old Delco-Remy service bulletin that
explains the
differences:
http://www.ruiter.ca/mc/info/PDFs/1R-116.pdf
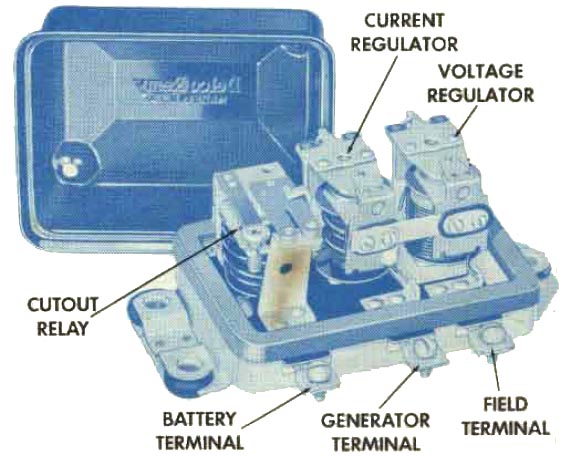
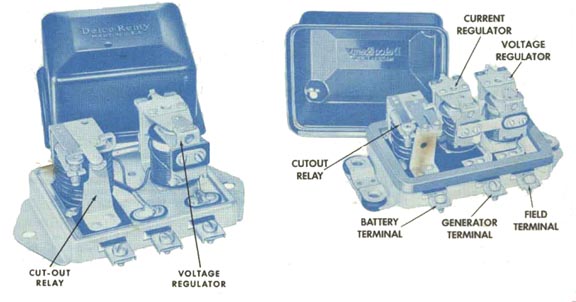
My Fly Baby's regulator is what Delco calls a "Three Unit" type,
vs.
the Auto regulator which is a "Two Unit" type. The
difference? The "Units" refer to the number of control
relays
inside the regulator. Both have a cut-out relay and a
voltage
regulator relay, but the Three Unit type adds a current
regulator as
well. Because the current limiter is connected to the
voltage
regulator by a bus bar, the terminals associated with the two
relays
are closer together.
Operationally, though, what's the difference?
It's pretty simple: The two-unit type was designed for a
three-brush
generator... the third brush design means the generator doesn't
need an
external device to limit the current output! Take a look
at these
illustrations from the Delco regulator service manual.
No wonder the
two-unit one didn't work in my airplane...and the airplane one
failed
the test for a two-unit type.
The
Delco Service Manual
for
the Three-Unit
regulator says, "Regulators covered in this bulletin are most
often
used on aircraft and 24-volt applications."
This leads to one problem: because the three-unit
regulator has a
current limiter circuit, there's no such thing as a "universal"
regulator. The regulator used has to have a current
limiter
setting that matches the maximum current that the generator is
designed
for. So there's not a "one size fits all' solution for
regulators: Your replacement either has to have the same
part
number as your old one, or be listed as the matching regulator
for your
specific generator model number.
I'm actually sweating this a bit, in my case. My
flea-market
regulator *is* a different part number than my old one.
I'm
keeping an eye on the voltmeter and ammeter, and will shut the
generator down if it looks like things are going haywire.
On the
positive side, the only time the current limiter comes into play
is if
the plane is drawing a LOT of power during operation. I
don't
have a landing light or any other large users of power.
The
starter, yes, but my engine starts quick enough that it doesn't
pull
the battery down very far.
By the way, the earlier manual also says that the 'three-unit
regulator
is designed for use with Delco-Remy shunt-type generators with
externally-grounded field circuits." So I guess that
answers THAT
question....
Trouble-Shooting
All right, your aircraft isn't charging. There are three
main
suspects: The battery, the generator, and the regulator.
Before you stick those usual suspects under the spotlight,
consider a
more subtle foe: Loose wiring. Go through the
system, and
make sure all the wiring is clean (e.g, no corrosion) and tight
on
their connections. Don't forget the ground connections,
especially... I had a car that was giving me fits, once, then I
discovered the cable from the engine to the car frame was
loose.
Not off...just loose.
So check the wires, first...they're the cheapest thing to fix,
anyway.
Is it the Battery?
Aircraft batteries, like car batteries, don't last
forever. I
live in Seattle, a very mild climate, and get about eight years
on a
car battery. Back when I lived in Colorado, it was more
like
three years. Aircraft batteries have it pretty rough; they
tend
to sit around a lot rather that getting daily discharge/recharge
cycles
like a car battery. I used to get about three years on
aircraft
batteries here in Seattle. I'm currently have about 3 1/2
years
on my current battery, so it was under suspicion in my recent
troubles.
It's usually pretty easy to tell if the problem is in the
battery. If you have a voltmeter in your airplane and it's
showing a good healthy 14V or so when the engine is at cruise
power,
then the charging system is good, and the battery itself is
probably to
blame. In any case, if the voltage is *ever* higher than
the
battery itself, the generator/regulator system is probably not
the
problem.
Batteries generally go bad by losing the ability
to hold
a charge, so the best way to check them is to use a battery
charger. Disconnect it from the airplane and charge it
up.
It should show about 12.6 volts for a conventional lead-acid
battery...
less for some battery types. Go online and find the specs
for
your battery.
Let it sit overnight or even for a couple of days. If the
voltage
is down significantly, the battery probably needs replacement.
Assuming it held its voltage, your problem may be that something
in the
airplane is secretly sucking down power when you think the
switches are
all off. When you re-install your battery, only connect
the
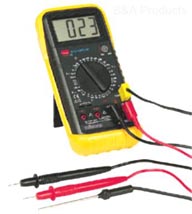
positive terminal. Take your portable voltmeter (I
recommend a
DVM - digital voltmeter - as shown to the right), and switch it
to the
current-measuring mode with the highest reading scale.
Make sure
all the switches in the airplane are off. Then touch the
red
(positive) probe of the meter to the aircraft battery cable, and
the
black (negative) probe to the negative terminal on the battery.
The meter should read zero amps. If it does, reduce the
scale of
the meter to ensure that there's not a little trickle of current
(DVMs
usually have only one setting, and auto-range to give the
most-accurate
reading).
If you DO find that current is being drawn from the battery even
with
all the switches turned off, that means that something isn't
really
"turning off." It's sucking the life out of your battery
as the
airplane sits. A good example is a clock, which has to
have
continuous power to keep working. Their power draw is
usually a
tent of an amp (0.1 amp) or less, so they're generally not a
problem
unless the plane sits for a long time.
The trouble-shooting process in this case is to disconnect
electrical
gear, one unit at a time, until the ammeter shows that the
unplanned
power draw is gone.
A final note on the battery: They most often go bad if
they
inadvertently get fully discharged. So if you left the
master
switch on and came back to a dead battery, don't be surprised if
it's
PERMANENTLY dead.
Is It the Generator or Regulator?
Assuming the battery is OK, the wiring is tight, and the plane's
voltmeter doesn't rise over the battery voltage in flight, then
either
the generator or the regulator is bad.


 If you read the tale of my earlier
generator woes,
you'll see that I bought a new regulator at an auto supply
store, but
it didn't work. Eventually, I noticed that the spacing of
the
terminals were different, as shown by the drawing on the right.

 Batteries generally go bad by losing the ability
to hold
a charge, so the best way to check them is to use a battery
charger. Disconnect it from the airplane and charge it
up.
It should show about 12.6 volts for a conventional lead-acid
battery...
less for some battery types. Go online and find the specs
for
your battery.
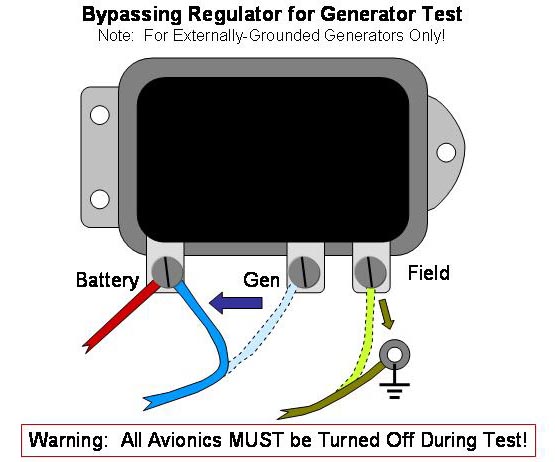 But which is is? Fortunately, there's
a relatively
quick test that will bypass the regulator and tell you whether the
generator is capable of producing power.