Goodyear Wheel Replacement


August 2009

It's funny.  In the 13 years I've owned my Fly Baby, the one thing I've continually cussed out is the Goodyear wheels.  They're hard to get off, almost impossible to put back on, and parts prices are out of sight  ($180 for a set of brake linings).  The one GOOD thing I'd say about  them is that the brakes weren't very powerful.

Every time I had to pull them off to grease the bearings, I'd scream  that I was going to junk the damn things and put something from the 20th  century in their place.

Went out to fly a couple of weeks back.  I was pulling the plane out of the hangar, walking backwards, and turning it to point down the taxiway when my  foot brushed something.  The something went "tinkle tinkle tinkle" as it  skittered away.

Now, I was on a public taxiway.  No reason to think it was something  associated with my airplane.  But I stopped and started scanning the  asphalt.

Found a broken piece of a Goodyear brake clip.  Gee, now where could  THAT have come from?

From my left wheel, of course.  Each wheel has three of these spring-loaded clips riveted to the wheel to hold the internal-gear brake  disk in place.  My left wheel was missing one.  The part I held was just  the outer portion that normally fit into a square slot on the brake disk  to hold the disk in place.  Here's a picture of the wheel, with a  screwdriver holding one of the spring clips up:


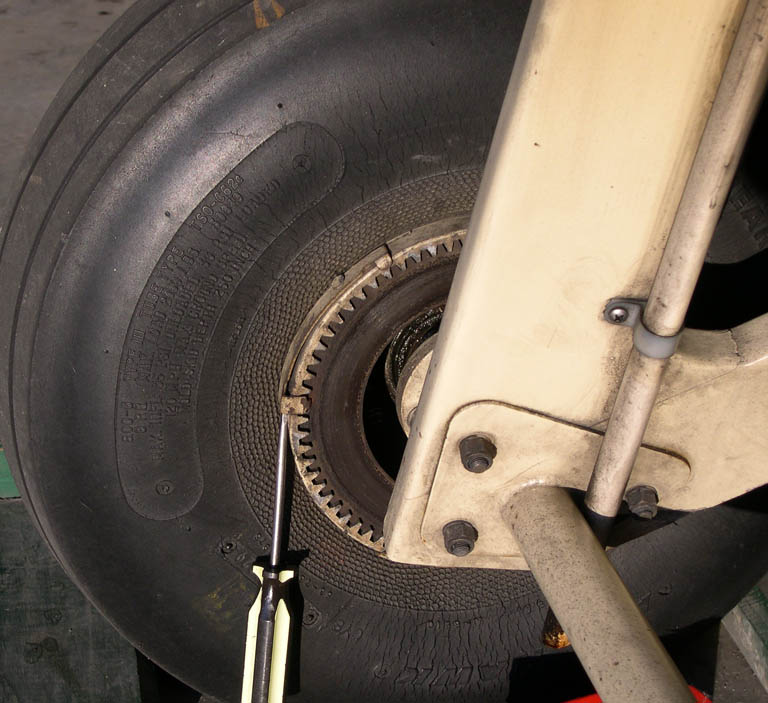
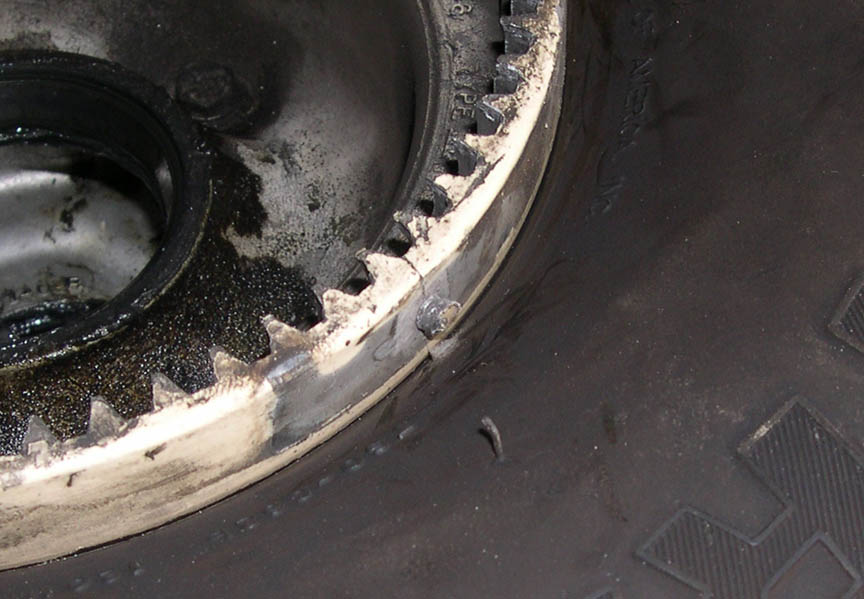
As it turned out, one of the three clips was gone entirely, and one of them had the "head" broken off (that was the piece I stepped on, in the taxiway).  It looks like the clip failure was precipitated by a crack in the wheel rim.  Note the picture below, taken after the wheel was removed.  You can see the "paint shadow" of the clip that's gone, the deformed rivet that used to hold it in place, and the crack from the rivet hole to the edge of the wheel  I'm guessing the wheel torqued a bit and the cracked area popped off the clip.


I considered just buying a set of replacement clips, but the fact was, that crack wasn't going to go away.  Goodyear wheels have a fairly bad reputation for locking up; they lose clips, and the brake disk twists slightly and jams in the caliper.  After thinking about it a bit, I figured it was time to bite the bullet and replace the system entirely.

The Mechanics

The biggest issue I had was how much work was involved to substitute another manufacturer's wheels for the Goodyears.  Most planes have an axle with a big nut at the end.  You slide the wheel on, then tighten the nut until the wheel bearings just start to bind.

In contrast, the Fly Baby uses a rather simple...nay, primitive....system.  A piece of tubing slides over the axle to set the wheel's distance from the brake plate (more later), then the wheel goes on, then another piece of tubing slides onto the axle outboard of the wheel.  This tubing has a through-hole drilled in it that matches a hole drilled through the end of the axle.  A bolt goes through the hole in the tubing through the axle, and a nut holds the cross-bolt in place.  The left side of the figure below is an exploded view of the system, and the right side shows what it looks like when it's all assembled.


So...what's wrong?  Obviously, the lengths of the two spacer tubes are critical.  If one or the other is too long, the cross-bolt won't fit through the outer tubing and the axle.  If one or the other tubing is too short, the wheel will be loose...it'll slide in and out.  The stock system, with the end of the axle threaded and a big nut, gives a lot of adjustability.

If my new wheels were just a little wider or narrower than my old Goodyears, my spacer tubes wouldn't be the right size.   I ordered some additional tubing to be able to make new spacers if necessary, but I was a tad worried about the one with the cross-hole.  I'd have to drill a new tube's cross-hole to match the axle...a bit tough to do.

There's another factor some folks will mention:  the wheel bearings are designed to have some compression on them.  On this system, the bearings are never really tightened in place.  The bearings will move a bit, and wear out quicker.

I don't think the latter is a big issue with a Fly Baby.  My plane had ~480 hours over 25 years on the Goodyears, and there wasn't any apparent problem with the bearings.   I think a Fly Baby just doesn't put THAT much stress on wheel bearings to begin with.

Finally, it's very difficult to retrofit a nut-type system to an existing Fly Baby.  Both ends of a ~5" tube would have to be threaded...almost impossible to do on the airplane, so the landing gear would have to be completely disassembled.

Picking a Replacement Wheel

(Before going on, you might want to check out my Wheel Selection page to understand some of the nomenclature.)

My Fly Baby was built around 6-inch wheels, NOT the 4-inch Cub-Type Goodrich (note rich, not year) wheels that Pete specifies.  If I'd had the Cub-type wheels, several companies offer conversion kits for them and my decision process would have been much easier.  But I've got 1.5" axles, which means I need to use 6-inch wheels.

I had two basic criteria for picking the replacement:  The ability to install with a minimum amount of modification, and the desire that the brakes not be appreciably more powerful than my Goodyears.

Why the last criteria?  Because strong brakes and a tailwheel configuration are a bad combination.  Use too much brake at too high of a speed, and a taildragger flips over onto its back.  Not for me, thenkyew.

In reality, though, there wasn't much I could do about it...it's not like brake strength is adjustable.  The thing to do was to avoid buying brakes designed for much heavier aircraft.

I received several suggestions for wheels to use, but I'd had my eye on Grove wheels for nearly ten years.  Groves are very similar to the common Cleveland brakes used in aviation...in fact, they're designed to use the some of the same parts, like the brake pads.  Most of the other suggestions were for, basically, ultralight wheels.  My airplane has a fairly high empty weight, though (805 lbs), so I didn't want to scrimp on the wheels. 

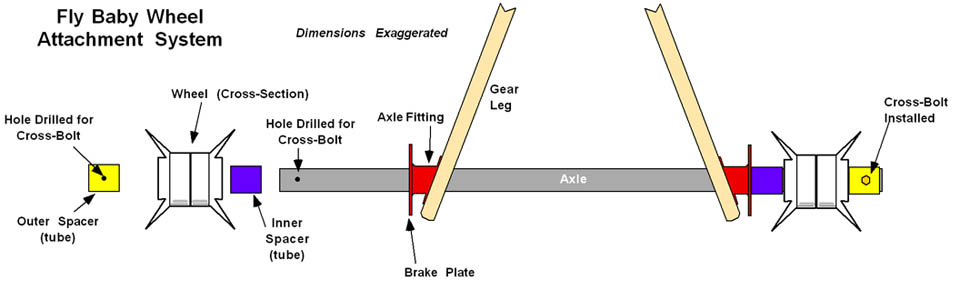
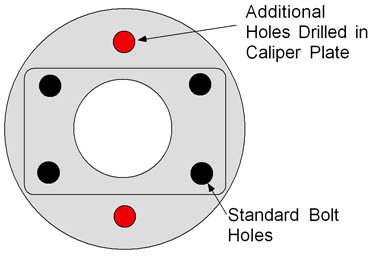
I had a bit of a problem, though...all the Grove photos of their lighter-duty wheels showed that the calipers bolted to a rectangular four-hole pattern, and I had a three-hole circular pattern on my Fly Baby.

The folks at Grove put me straight.  The bolt holes were all at the same radius from the middle... the four bolts were just the rectangular pattern across the middle of a 6-bolt pattern.   They offered to make me a set of caliper plates that had the full six-bolt pattern.  I ended up getting a set of Grove 61-1 wheels with the custom caliper plates for their list price for the wheels themselves.

Got some other parts, as well.  I'd gone through the Aircraft Spruce catalog and bought some Nylaflow brake line and the fittings I thought I'd need.  I also bought new nuts and washers for the AN6 (3/8") bolts and a jug of brake fluid.

First step was to slack off the master turnbuckle, disconnect the flying wires, and jack up the left side of the plane.  With two broken clips, the brake disk on my old Goodyears was basically free already, so it took just a couple of minutes to get the wheel off the airplane.

Taking the Goodyear brake caliper off took a bit more work.  Two of the three AN6 bolts were easily removed, but the nut on the last one was in a recess in the cast-aluminum caliper mount.  Couldn't get a wrench on it. Thought I was going to have to pull the axle insert, but I was able to jam it with a screwdriver sufficiently to hold it while loosening the head.  I disconnected the brake line, and slid the Goodyear caliper off.

Mounting the Groves

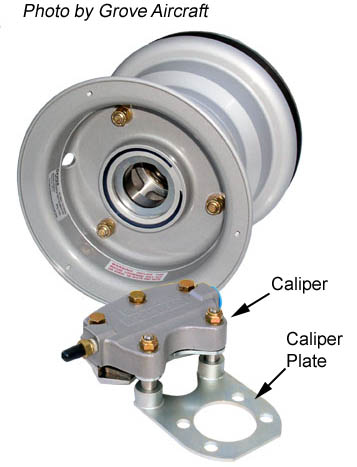
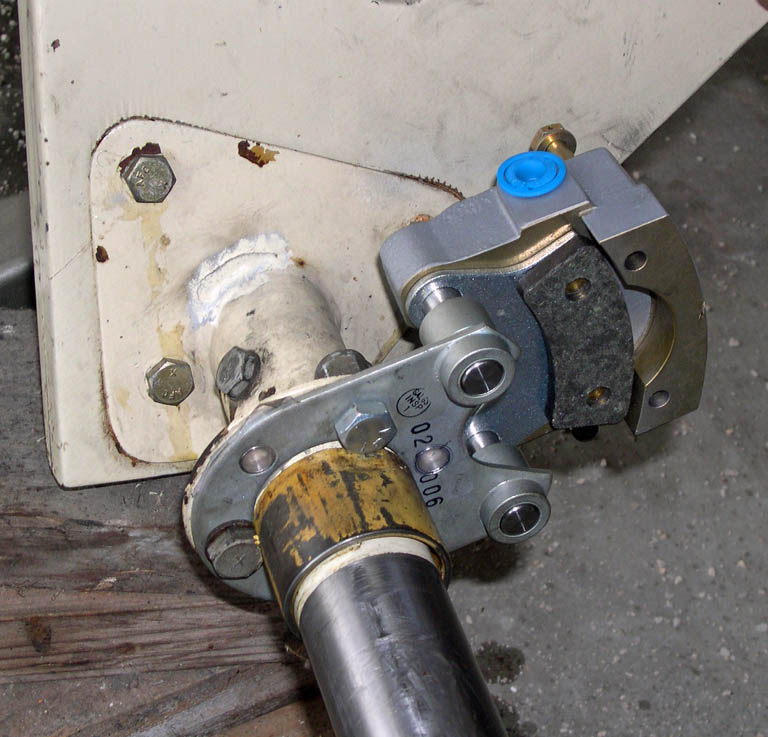
The Grove brake calipers mount to a plate attached to the axle.  The plate has two heavy-duty bushings that fit thick pins on the caliper. The caliper isn't actually attached, it can slide a bit, but of course the two brake pads keep the caliper in place.

I slid the Grove caliper plate into place to put the caliper aft. Unfortunately, it became clear that the caliper wouldn't be able to be removed normally, once installed in that position...the slanting gear leg wouldn't let it slide out of the bushings.

Unfortunately, it also appeared that the AN6 bolts used to hold the Goodyear calipers were too long for the Grove caliper plates.  The Grove plates are flat metal, and the Goodyear units were thick castings.

Fortunately, this is one of the reasons I decided to take Friday off from work and fiddle with the brakes.  My plan was to build a list of the parts I needed, then make my oft-repeated Saturday trip to the airplane parts emporium.

As I mentioned in a previous post, my axles aren't threaded.  There's a piece of steel tubing slid over the axle as a stop to set the inboard position of the wheel, and another piece of tubing with a transverse hole for a cross-bolt to hold the wheel in place.

The next thing to do was to figure out the right length for a replacement inner-axle spacer and determine if I could size it to use the existing tube-with-cross-bolt on the outside or whether I'd need to drill a new piece of tubing.

I slid the inner spacer on, then positioned the wheel and slid it down over the axle.  I then pushed the cross-drilled tube into place...

...and it was a perfect fit.  The Grove wheels were the same width- between-the-bearings as my Goodyears.

Right at this point, I started getting excited.  Bolt the caliper plates in place, connect up the brake lines, and I'm flying again!

There was an aviation-maintenance facility on the airport, so I grabbed one of the old plate-mounting bolts to see if they'd have shorter ones (I needed an AN6-7A).  No luck.

I started thinking about driving to the aviation parts emporium now, instead of Saturday.  Unfortunately, the odds were good that I'd need *more* parts from them, not just the bolts.  I hated making the 40 mile round trip, especially since it was just starting to hit rush hour and the route I had to take was one of the worst from the congestion point of view.

So I reluctantly decided to hold off and make a big Saturday run instead.  I stopped by NAPA Aerospace on the way back to the hangar and bought three 3/8" bolts so I could temporarily install the plates so I could run the brakes.  I deliberately bought only enough for one side so I wouldn't be tempted to use them on the airplane.

To Grade 5 or Not Grade 5

All right:  some of you are probably asking:  Why not use the Grade 5 bolts?  Grade 5 is nominally the same strength as AN!

I'll admit, my mind was kind of swinging that way...until I actually bought the Grade 5 bolts.  They really looked...cheap...in comparison to the AN hardware.  They were threaded all teh way to the head, instead of having a smooth "grip length" area where the bolt made contact with the insides of the holes.  And shiny coating on them really looked cheap, in comparison to the cadmium-plated AN bolts I was used to.


The store did have Grade 8 bolts, which at least were cadmium-plated.  But the thread size was wrong...they were 3/8"-20, instead of 3/8"-24.  The AN365 elastic stop nuts wouldn't work, I'd have to use lock washers instead.

So...reluctantly, I decided to just use the Grade 5s temporarily, and run up to the aviation parts store on Satuday.  Back to the plane and bolt (temporarily!) the caliper plate into place.  Here's the temporary installation of the caliper plate, using the Grade 5 bolts:


Time to look at how the connect the Nylaflow tubing to it.  It was instantly obvious that the fittings I'd bought for the Nylaflow tubing wouldn't fit the pipe/flare fitting on the caliper, either.  So I was out of luck, until and unless I ordered more parts.

Looking at the position of the caliper, though, it appeared to me as if I could still use the existing aluminum lines.  The calipers won't have to move much, and the nearest attachment point for my existing metal lines is a good foot or more away.  The flex won't be much, and with a bit of curve in the line to absorb the motion, it probably wouldn't be a problem.

The airplane parts emporium would have the fittings I'd need.  The existing tubing might work, but I figured I'd buy more tubing there, just to be on the safe side.

I spotted a buddy working on his RV-7, and stopped by to talk to him about the Nylaflow fittings.  I mentioned that I was considering just using aluminum again, and he rummaged under his workbench and found a long coil of brake line...and his flaring tool.

At this point, another friend stopped by.  We chatted for a bit, and I described the work I was doing.  I mentioned that I'd be going to the airplane parts emporium Saturday to get the stuff I needed.

The response:  "They ain't open on Saturday, anymore."

A quick phone call confirmed it.  They were closing in forty-five minutes, and it'd be an hour's drive in rush-hour traffic.  My RV buddy offered to fly me there (5-minute flight), but he had been doing some maintenance and I didn't want him to rush putting the plane back together.

So, back to the hangar.

I had anticipated needing an hour or two (or more...) to cut the new spacers and cross-bolt tubing.  Not necessary.  With tubing, flaring tool, and brake fluid on hand, the 3/8" bolts were the only things keeping me from finishing up the work.  And I'd probably end up *ordering* those, waiting several more days for shipping.

Arggh.

By this point, those 3/8" bolts from NAPA Aerospace were looking *pretty good*.  But...but... This was a fairly critical location.  My plane uses only three bolts, instead of four like most planes seem to.  I reluctantly gave up on the installation and went home to order some bolts.

The Right Parts, and Ready to Go

Once I got the right parts, installation was "sorta" straightforward. The right-side caliper plate bolted right to the axle plate welded to the axle, and the caliper slid into place.

However, the left side was a bit tougher.  The axle plate was apparently slightly closer to the gear leg, and once the plate was in place, there wasn't enough room to snake in the caliper and slide its shafts into the plate bushings.  I shaved some of the gear leg wood to try give enough room to put it on, but no go.

Just for S&Gs, I tried to slide the caliper in from the *wrong* way.  It wouldn't go!

The three bolts holding the caliper plate to the axle plate had been reluctant to seat into place; I figured the bolts had just enough of a mismatch as to torque the caliper plate slightly and misalign the bushings.  So I backed out the bolts, and shaved the axle plate bolt holes until the bolts would slide in with little resistance.

I slipped the caliper in place before tightening the bolts, and both sides were ready for their wheels.  When it comes time to replace the inner pad on the left brake, I'll probably have to at least loosen the mounting bolts, but this shouldn't be that big of a deal.

One thing I considered at this point was painting the new wheels.  They came with a semi-gloss gray finish, and I contemplated painting them beige to match the airplane.  But I got a bit worried about how they'd look bad if the paint didn't stick.  Decided to go with the gray, and explore putting together a hub cap of some sort.  Bob Grimstead used plastic picnic plates on his plane....

The old tires and tubes were transferred from the Goodyear wheels, and it was time to pack the new wheel bearings.  I've been packing bearings the same way since I was 16, but with new, fresh bearings, I decided to give one of those cone thingies a try...you know, the thing that clamps the bearing between two fairly flat cones and lets you pump the grease into the middle area.

I don't know if it was me, or the cheap setup I bought.  It would *not* force the grease into the bearing area, it either oozed out at the top or the bottom.   So I ended up doing it the old-fashioned way.  Here's a shot from an auto page that pretty much sums it up....

With the right wheel in place, all the spacers installed, and the cross-pin inserted, the wheel was just slightly loose.  Fortunately, a friend had made me a set of steel shims (just big washers with 1.5" ID) a few years back, and one of those tightened up the situation.

The wheels are both probably about 1/8"-3/16" too far inboard; the shafts on the calipers don't go completely through.  I could shave the outboard spacer (the one with the cross bolt) a bit and either add shims to the inboard spacer or make a new spacer.  But I figure it's engaged enough, and will actually improve as the brake pads wear.

One thing that was tickling me to death at this point was how EASY it was to remove and replace a wheel.  With the Goodyears, getting the gear-toothed brake disk fully engaged inside the wheel was a major hassle...just managing the clips was work enough.

With the new setup, the wheel just moved off and on without the need to fiddle with things.

As I was bolting the left wheel into place (WHY is it always the one side???), I noticed a problem.  The tire stem was hitting the through-bolt on every turn of the wheel.  The tire had an elongated cap with a fitting to remove the valve stem.  The right side had just a plain cap, but it appears that the bolt is slightly more outboard than the left side.  Swapping the caps left to right did the trick.

With the wheels installed it was time to finish up the brakes.  The outboard half of the caliper slipped into the gap between the inner portion and the tire, and the bolts were quickly snugged up and safety-wired.

I had put a lot of thought into brake lines, and talked with several local builders.  The Goodyear calipers didn't move, hence a solid aluminum brake line was the best solution.  But the Grove calipers were self-centering, sliding back and forth a bit.

After fiddling with things a bit, I decided to stick with aluminum.  The caliper doesn't move much, and the aluminum brake line isn't solidly attached to the airframe (floats a bit already)  The big plus is that the position of the Grove brake port was almost the same as my old Goodyears...I re-used the same brake lines!

With everything connected, it was time to fill the system with fluid. The standard was on aircraft is to fill the system from low to high...pump fluid into the caliper from a low point until it and the actuating cylinder are full.  This purges all the air from the system as it fills and eliminates the need to bleed the brakes.  All it takes is an old pump-type oil can with a rubber hose that fits the nipple on the bottom of the caliper.

This was again one of the sore points for my old Goodyears.  It didn't *have* nipples on the bottom of the caliper, just a bolt to stop the hole.  Years earlier, I'd had to carve a plastic tube to jam into the bolt hole to fill the Goodyear brakes.  Getting the tube to seat decently was a problem, and when the brakes were full, I had to pull the tube away, stick a finger over the hole to stop the fluid from draining out, then scramble around with my other hand to find the bolt that plugged the hole.  That Dutch Boy routine got old, real fast....

Happily, the Groves came with a modern bleeder screw.

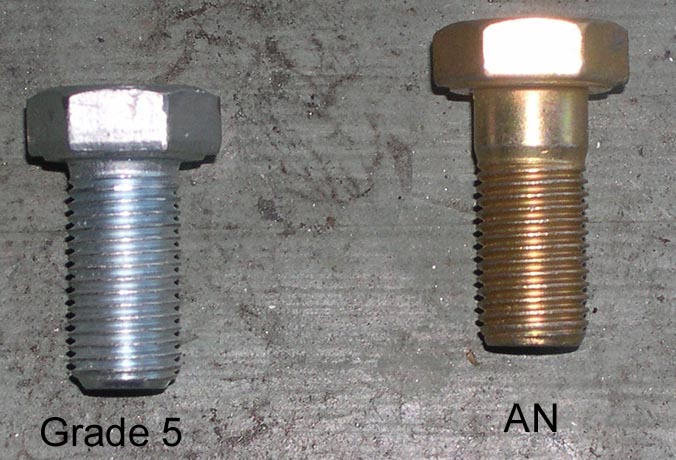
One traditional "fun part" remained...opening the fill hole in the top of the brake master cylinders to allow air to escape while the brake system was being filled.  There's no access to it from the cockpit.  The only way to get at it was from below, after removing the traverse inspection panel just behind the firewall.  See the "existing front inspection panel" in the figure.

Since the master cylinders are vertical, the vent screw is on top, and completely out of sight.  Years ago, my Dad tried to impress upon me that a good mechanic didn't HAVE to see what he was doing.  He wasn't here, so it was up to me.

SOP to remove the plug is to sit with my back against the wheel, reaching up past the hinge tube for the rudder pedals and unscrew the vent.  One ends up with an arm completely disappeared inside the fuselage and a vacant expression on one's face while fingertips do the work; something like a cow veterinarian who dislikes his line of work.

With the left side being the troubled child, I started there.  Feeling around on the top of the cylinder, it felt like it needed an Allen wrench.  A bit of trial and error, and I found the right one.

Cap off, loosen the bleeder screw, slip the hose over the nipple, and start pumping.  When hydraulic fluid starts dripping from the fuselage, remove the hose and tighten the bleeder.  Re-install the cap, and tuck the Allen wrench into the pocket for removing the cap on the right side.

Unfortunately, the wrench didn't fit.  Feeling around, it seemed like, perhaps, something had fallen into the recess of the cap.  I tried a variety of ways to clear it, to no avail.  Out of frustration, I tried squeezing the plug and turning it with my fingertips.

Whoa...did it move, just slightly?  Or was it just my finger slipping?

I sat, back against the wheel, left arm jammed in the innards, index finger and thumb burning as I tried to back the plug away.  I'm an engineer, dammit, not a callused-fingered mechanic.  It hurt like hell...but it did apparently keep moving.

And, eventually, it came free.  It was set up for a standard-bladed screwdriver, not an Allen head.  Why in the world were they different?

Anyway, tanked up the left side, reattached the flying wires, tightened the master turnbuckle, and it was ready to go.  Into the cockpit.  Both pedals initially soft, but a bit of pumping brought them up.  The left one was just a bit softer than the right.  Figures.

Plenty of daylight left.  However...geeze, I was a bit creaky and achey from crawling around the airplane.  Plus, it was a bit windy... if the brakes for some reason didn't work, it would be a real bear to get it back to the hangar.  Finally, I really wanted to look at it again, carefully, with fresh eyes before flying it.  So I cleaned up and went home.

Test Flight

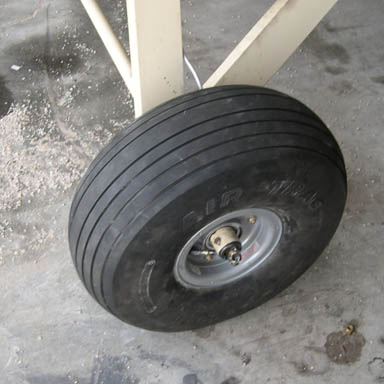
Finally, I had a chance to try it out.  A good thorough look-over of the wheels and brakes, then roll the plane out.  My plan was to taxi around the airport for a while, then bring it back to the hangar and re-inspect. The break-in instructions said to taxi for a while with the brakes dragging and them let them cool.

The weird thing was, in the month since my last flight, they've started major construction at my home airport.  Taxiways are torn up, and the usual routes didn't really exist any more.  So I had to pay a lot more attention to where I was going; wingtip clearances that were a given before didn't hold true any more.

Taxi around, dragging the brakes, and performing tight turns to verify that the wheels wouldn't shift.  Back to the hangar.

The left brake was leaking fluid.  I tightened the fitting a bit more, but I could still see it welling up.

Crap.  I had everything I needed to build a new brake line, and an hour later, I had the new one installed and the brake filled with fluid.  The pedal was definitely harder than it had been; it was about the same as the right, now.  There was initially a bit of seepage, but tightening the fitting seemed to clear it up.  Mount up, take off, shoot some touch and goes, and return to the hangar to verify things were OK.  No leaks.  Work complete.

One of my biggest fears was put to rest; the new brakes aren't touchy or over-powerful.  They seem to be about the same power as my Goodyears, and that was exactly what I was looking for.

Wrap-Up

I'm very happy with the wheels/brakes, and very happy with the support given by the Grove company.  The package was complete, and they modified the caliper plates at no additional cost.

I did weigh the Goodyears after dismounting the tire and tube.  The Goodyear set was about four pounds lighter than the Grove (6 lbs per side vs. 8 lbs).  I suspect the Goodyears are magnesium, which was an option on the Grove that I decided to forgo.

Looking at the Goodyears, replacement rather than repair seemed like a good move.  The left wheel had one clip missing entirely, and a second one broken.  There was a short crack from the rivet hole of the missing one to the edge of the wheel, covered with dirt, mostly covered by the clip, and the remaining portion looking just like the myriad scratches on the edge of the wheel.  Here's a shot after a wipe-down:

There were other signs of distress on the calipers, some gouging, etc. where the disk went through.

Now that it's all done, the replacement seems like a MARVELOUSLY good idea.

Ron Wanttaja


Return to the Tech Page