 But what
the heck.
I was free every day, and the December weather here in Seattle was
unseasonably
clement. What the heck...why not get some flying in?
But what
the heck.
I was free every day, and the December weather here in Seattle was
unseasonably
clement. What the heck...why not get some flying in?
It probably couldn't have been worse timed.
I'd been downsized at work and unemployed. No real problem; I'd seen the signs and had laid the groundwork for finding another job.
But what
the heck.
I was free every day, and the December weather here in Seattle was
unseasonably
clement. What the heck...why not get some flying in?
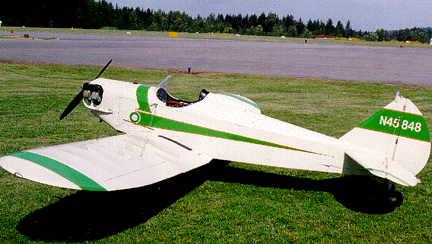
But as I taxied Moonraker down the taxiway, it suddenly jerked to the right. I figured I'd hit a leftover chock or something, but when I got out of the plane, there was nothing in sight.
Decided to push the plane back down to the hangar. It rolled about two feet, then the right wheel jammed. There was something solid ratting around inside my Goodyear wheel hub.
Anyway, I eventually made it back to the hangar. Didn't have my wheel-removal gear with, but I did fish what looks to be half a brake pad out of the inside of the wheel.
Damn. At least I had the time to work on the darn plane, even if I can't fly it. Unfortunately, I'd heard some ugly stories about parts availability and costs for Goodyear brakes. There are probably a number of Fly Babies with Goodyears...back in the '60s and '70s, a lot of Cessna 172 owners converted from Goodyears to the then-new Clevelands. Those old wheels and brakes were then snapped up at low prices by the homebuilding crowd.
So I pulled the wheel off and started poking around. Turns out that one of the through-bolts for the wheel lost its nut and dropped into the wheel. It jammed into the calipers, and scooped out and broke the fixed brake pad (the one not on the moving piston). It's about an inch wide and two inches long, and measured a tad over 1/4" thick. I checked the Aircraft Spruce catalog. Price: $250 bucks each.
In the immortal words of E.T.: "Ouuuuuchhhhhh."
It was simply amazing. A full set of brake pads for the Goodyears would cost over $750...more than the cost of a complete set of Cleveland wheels and brakes, and about $200 more than a complete set of Groves!
One nice thing about my plane is that I've got 1.5" axles. That's a real standard size. Stock is 1.25" to fit the Cub-type wheels. Modern wheels that size aren't as available, but they do make a conversion kit. But I wouldn't need one.
Still, doggone it. Something just didn't seem right, spending that much money to fix a little 2" part. I hadn't started collected unemployment checks at that point (in fact, I never did file for them...), but it just didn't seem right spending my unemployment benefits to keep my airplane flying.
The main advice I was getting from friends was to make a new pad from auto-brake lining material. Since I'd gotten into the weekend without trying a lining shop, I wandered over to the local NAPA Aerospace and asked to see a selection of disk-brake pads. The riveted ones I looked at didn't have enough space free of holes to cut out my pad, but I found a beautiful set with the lining bonded to a steel backplate. I figured I could cut the lining free from the steel and surface the cut piece. Each lining was a bit bigger than the pad I needed, and the curved outer edge was even about the same radius as I needed.
I took the pads back to my hangar, attached one to the end of a 4x4, stuck it in my horizontal bandsaw, and set it to cutting.
I let it run for a half-hour while I worked on reconstructing the
shape
of the original pad. I had about 3/4 of one, and the angles and
everything
looked like it was symmetrical. I outlined it on a piece of
aluminum,
flipped it over, and added the missing end. Cut out the aluminum,
test-fit it on the airplane, then carve it a little more to make it fit.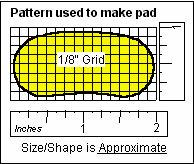
[Note that there are several styles of Goodyear brake pads. The most common ones are circular, not the kidney-shaped like I have. Still, the process should work the same.]
This took about a half-hour. I went back to the saw to see how the lining-cutting was going, and found little progress. It barely wore a groove in the lining. It finally started to cut when I put a waaaaayyy amount of pressure on the bandsaw arm, but, of course the pressure flexed the blade and the cut went askew.
I took the pads home and tried them on my aluminum-cutting three-wheel bandsaw. Still wouldn't cut the lining from the backplate. Figuring I was sunk anyway, I tried a chisel and a hammer to try to pry it off the backplate. The pad shattered.
As of this point, obviously another approach was needed. I figured I'd wait until Monday and try buy lining material. Looking in the yellow pages found a good candidate source...if that failed, I'd look at the riveted ones again to see if I could find one with enough space to fit my little pad.
I drove to the brake-lining shop Monday morning. I showed the counterman my pad, describing it as from an "antique wheel." We discussed the probable original thickness...the pad is currently a skoosh less than 1/4", and I didn't have any references for how thick new ones were. We decided on 5/16" as a size which we'd be pretty sure wasn't TOO thick.
"What's this from?" he asked.
I said, "A Goodyear aircraft wheel."
"We're not allowed to sell parts for airplanes...."
"Then it's for an 'Off-Road Vehicle'."
"That's fine, then." He said the lining material came in 20" by 20" sheets, but he'd see if they had a scrap they could sell me, instead.
He came back five minutes later with carved-up piece that still had enough material to do a dozen or two of my little pads. He called the boss over, and asked him how much they should charge me for them.
The boss looked at the material, and examined my little pad. "What's this from?" he asked.
"An Off...Road...Vehicle," I replied.
The counterman chipped in: "I told him we couldn't sell parts for airplanes."
"Well, an off-road-vehicle is fine...."
Since they had no part number for scraps, the boss decided a $15 contribution to the office beer fund would be acceptable.
Back home, I dropped my aluminum template on the scrap, traced the outline, and put the piece on my bandsaw. It cut quite nicely, and smoothed easily on the benchtop sander. I hauled it down to the airplane, did a little fit-sanding, and eventually got it to pop nicely into place. Some red RTV, some clamps, it was done.
Since the inner portions of the tires were quite worn, I decided to pull the other wheel off as well and swap tires between the sides as well as turning them. I started to remove the remaining two through-bolts on the wheel that had locked up...and found they were loose, as well.
The bolts weren't loose on the other wheel, but after I got the lock nuts off, I noticed they could be turned by hand into place....the metal lock nuts no longer had enough friction.
There's a lesson there, both ways...I should have checked the friction before re-using the nuts the last time I had the wheel apart, and I should have double-checked the torque anyway. Obviously, I'm going to add a wiggle-check of these bolts to my preflight list.
The wheel that had locked up had a little bit of damage where the bolt had caught. A few of the little teeth on the inside of the wheel (used to hold the brake disk) had some damage, but since the disk had been in place, the actual locking area appeared fine. I used a Dremel to smooth out the edges of the damaged area.
I put most of it back together on the Monday before Christmas, then finished it up a few days later.
I took it out for a taxi, and it seemed like the newly-lined brake was a lot less powerful than the left one. But after using the brakes a lot, they both seemed to get pumped up and working about the same.
After I was done, I received an email saying that Barry Jay Aviation carries the Goodyear pucks. And so they do, for a very reasonable cost. [See update below]
From their listing, it looked like my pad thickness should have been 3/8" rather than 5/16" [Update - WRONG! See below]. I'm not too worried, as the new pad is about the same thickness of the pad on the other side.
Since I first posted this, a writer mentioned that the standard pads have a reinforcing mesh on one side. I didn't see any remants of that on my broken pad. It may be on the size thicker than the 3/8".
I *may* eventually go with a more-modern wheel, but the pressure is certainly off. The $15 I spent for lining material sure beats $750 for a new set of Clevelands, though....
Ron Wanttaja
Not too long after posting this message, Barry Jay aviation was
bought
out by Aircraft Spruce and Specialty, and the cheap Goodyear brake pads
were no longer available via their catalog. However,
subsequently, Aircraft Spruce had a "Barry
Jay Close-Out" sale, and the brake pads were again available, at the
original $16/pair cost. I bought some sets, and replaced my
home-made pads with the Barry Jay units. The home-made pads seem
to have held up fine. For those who are wondering my use of RTV
to hold the pads in place was fine, too...the pads weren't loose at
all. In fact, they didn't even have the reinforcing mesh I
mention above. This might be because these are aftermarked,
non-TSO's pads instead of the official Goodyear ones.
While I was at it, I measured the new pads. There are
actually two pads used on each brake, a thick one that rides on the
brake piston, and the thin one that slips into the shallow recess I
describe above (I hadn't replaced the thick ones, originally, but I did
when I put the Barry Jay sets in).
The thin pads were about 0.328 inches, just a few thou above the
5/16"s I'd guessed at. So don't get the 3/8" material!
The thick pads (the ones that go on the piston) were about
0.588. A tad more than 9/16ths.
Ron Wanttaja
