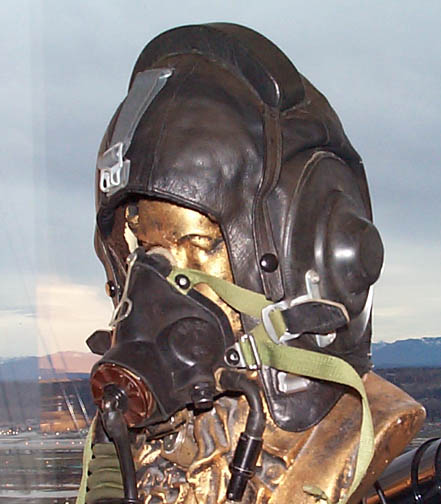
Last week, my wife gave me a Russian military leather flying helmet for Christmas. I was surprised at the quality of the helmet, and decided to try convert it for use in my Fly Baby.
 You can find these
helmets from a variety of places.
You can find these
helmets from a variety of places.Anyway, the first step was to try to get it to fit me a bit better. It was a metric size 56, about a size 7, and I generally wear about 7 3/8. It had a thick fleece lining, though, and since I didn't need it for warmth, I figured it could be removed to give me a little more room.
While the back end was held in by snaps, close examination showed the sides and front were stitched in. The stitches were through all the layers, so I couldn't just cut the stitching or the outside leather shell edge would be rough. The fleece's backing was thin, though, and cut easily with a seam ripper. I cut out the fleece, and the fit was good.
While I was doing fabric work, I cut the seam holding the head-cushion in place. It's a good idea on a canopy airplane, but wasted on an open-cockpit machine. Plus, it looks stupid. Turns out it isn't really a cushion; it's more of an indexing mark for when a hard helmet is worn over the leather one. The cushioning inside the helmet has a notch in it to fit the tab atop the leather one.
Now for the earphones. The helmet had two cords fitting out the back, one with a broad four-conductor connector and the other with a slim two-conductor one. Two conductors on the big connector were the only ones that showed anything less than infinite resistance. A quick check with a battery resulted in clicks from the ear cups, so I knew those were the headphones.
Things were a bit weird in the resistance department. I had expected that the earsets would be either 8-ohm commercial impedance or the ~300-ohm aviation standard. The DC resistance was over 3,000 ohms!
I have an old Escort 110 in my office for listening to local traffic. I connected up the headset lines and clip-leaded them to the Russian headset. It worked, but the volume was low. I had picked up the Rat Shack 1000:8 center-tapped audio transformer in case it had proved out to be eight ohms. I patched that in place, with no improvement.
So it appeared I would have to replace the speakers themselves. The insides of the ear cups had a thin layer of foam with a 3/4" hole for the speakers. I carefully cut away the thin foam to reveal a rubber membrane holding the speaker units in place. A few second's work with a small screwdriver as a lever, and the unit popped out.
It was small...about 1.5" deep, and about 3/4" deep. I was a bit
concerned
about finding a speaker element that small. I went to Rat Shack. They
had
2" tweeters (for about $25 a set) but nothing smaller. See
Update Below.
I considered whether I might get the tweeters to work...but decided to keep looking for one the closer size. I knew I could probably find something by mail or at the professional-level electronics stores, but this was Sunday and I wanted to get something working.
One thing that occurred to me is that the ear units from a Walkman-style headset might work. I looked at them, but they were rated only for about .1 Watt. I knew I would be operating at a fairly high level, so needed a heavier-duty speaker.
So, I went to Goodwill Aerospace. There, I found a decrepit set of Realistic headphones for $2, and another Rat Shack headset that had a built-in radio for the same amount.
To home, to disassemble the prizes. The headphones' speakers were 2", and looking at the headset, it was obvious they wouldn't work. I took apart the integrated headphones/radio unit...and found two 1.5" speakers.
So, I soldered the headset wiring to the speakers and popped them behind the membrane. Chasing down the wiring, I found the original speakers had been series-wired. I reworked the wiring to make them parallel. The cheap headphones had included a long cord and a 1/4" phono plug, so I was all set.
Microphone-wise, I had been intending to cannibalize a cheap aviation headset I bought several years ago. But when I opened it up, I found some sort of transistor network on the microphone line. I didn't really want to switch that whole mess over, so I decided to take a look at alternatives.
I dropped by the aviation parts store on Friday, and found a complete Flightcom boom mike replacement set. This was the parallel-wire sort of boom, and all it needed for installation was a small hole for a #8 screw. It cost $60, but included the cable and connectors and everything. The nice thing was, I wouldn't have to do ANY electrical work...all it needed was a mount.
The forward part of each ear cup on the helmet included a pair of small studs used to hold the hooks that the oxygen mask attached to. I removed one of the hooks and cut out a small piece of ~0.090" aluminum that fit the stud pattern and had a tab area for the mike mounting screw. Installing the boom was pretty staightforward. I strung the cable from the mike through a convenient leather loop at the back of the helmet, then tie-wrapped it to the earphone cable.
This afternoon, I gave it a try. The first thing I noticed is that the left headset output was a bit distorted...a bit of a buzz when people transmitted. Signal came in nice and clear, though. Probably a bad speaker.
The noise attenuation seems to be about the same as my old non-noise-cancelling headphones, or maybe just a tad worse. The exterior of the ear cups is just a bit of hard rubber, there is no noise-attenuating foam inside.
However, I was able to fly with the headset volume NOT at the maximum...on my old headset, I always had to fly with the volume up all the way.
The big advantage was comfort...it completely eliminated the head-compressing effect of a standard set of headphones. It also eliminated much of the low-frequency rumble (from the prop blast hitting the exteriors of the ear cups) that neither my old headset nor my noise-attenuating one seem to be to handle.
I did try it with foam earplugs in place, but, again, they worked a bit too well on the incoming transmissions as well. I had to operate with the volume all the way up, and concentrate on what is being said.
It short...it didn't work half bad. I'm still not sure if I'm going to give up my ANL unit for it. It's nice to get the low frequencies lessened, but radio clarity (and volume level) are really better with my Denalis.
But anyway, such a conversion is a viable alternative. I probably have less than $150 into the thing, which included a brand-new Flightcom microphone boom. And it looks a heck of a lot better than the usual commercial helmet/headset combination. I'll probably buy a set of brand-new speakers and see how they work out.
[Note: Talking to people afterwards, I probably should have tried
the
Russian speakers in the helmet before changing them out...they probably
would have worked just as well. They do need to be changed from series
to parallel wiring as described above, though]
