Russian Helmet, Round Two: Going
IPOD
February 2009
Updated March 2009
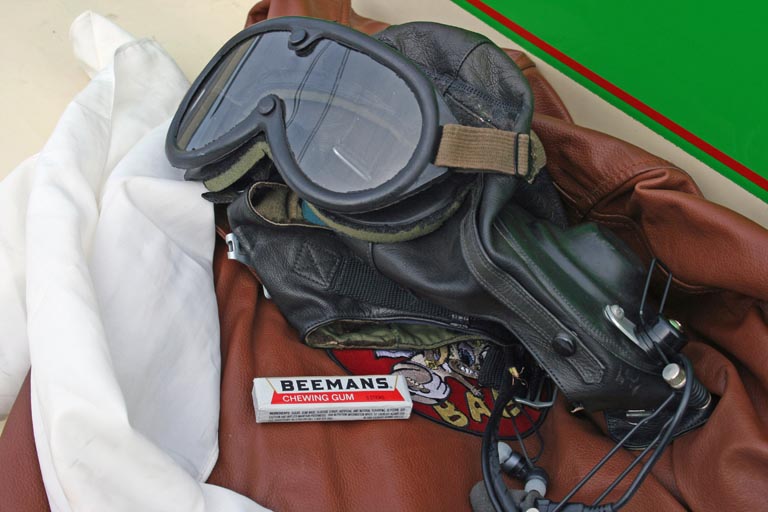 (The final version of the Russian
helmet. Note the IPOD ear buds just above the microphone and
below the patch)
(The final version of the Russian
helmet. Note the IPOD ear buds just above the microphone and
below the patch)
The Modification
A couple of years back, I posted a story
about adapting a surplus Russian flying helmet for use in my Fly Baby:
I actually didn't wear it all that much...the noise attenuation
wasn't as good as my regular helmet with my Flightcomm ANR
headset, and it was a bit too tight and too uncomfortable.
This fall, I started having some trouble with my ANR headset and
decided to send it in for repair. I tried to pick a time period with a
lot of bad weather forecast.
Unfortunately, last weekend turned out pretty nice. I decided to try
out the Russian headset again.
It didn't work worth beans. The speakers had deteriorated or something,
and it was very difficult to understand anything. Transmissions with
high audio power weren't too bad, but most everything else was
unreadable.
Plus, the helmet itself seemed impossibly uncomfortable. I had
remembered flying an hour with it back when I converted the headset,
and it wasn't too bad, but it was way, way too tight now.
As far as the speaker problems, I had a sudden brainstorm: What about
IPOD-like in-the-ear headphones... what they call "ear buds"?
On the way home from the airport, I swung by a discount store and
bought a $20 set of ear buds. At home, I ripped the old speakers out of
the headset, then cut off the plug of the ear buds to solder them to
the wires under the nylon helmet lining.
Bad idea. The wires on the headset are very fine, and I couldn't get
enough metal to feel comfortable soldering it.
The nylon headset liner has a sort of pouch for the wires around the
nape of the neck. I bought another set of ear buds and a 1/8" jack from
Radio Shack. A test fit showed that I couldn't feel the jack or plug
when they were in the pouch, so I soldered the contacts for the jack to
the existing headset wires, plugged the ear buds into it, and closed it
back up. I left enough wire for the ear buds so they'll dangle slightly
below the headset when it's picked up.
I should mention that the headphone cord on the headsets retained the
matching transformer I had attached to allow use of 8 ohm headsets in
an aviation circuit. I also retained the Flightcomm boom microphone of
the original installation. If you're starting from scratch,
you'll need to build an adaptor. I've got instructions below.
The next step was to try to add a bit more passive attenuation to the
ear cups of the helmet. Taking the speakers out just left a void
under the hard-rubber external shell. Matt Michael suggested
using pieces of Temperfoam, so I carved off a couple of scraps
and fitted them in.
The last step was to try to get the darn thing more comfortable. It
really wasn't the helmet's fault; it was sold as a collectible and was
probably a medium or even a small. Originally, I had removed most of
the wool-pile lining to get a bit more room, but some of the lining
still was caught under the front seam of the headset. Where,
coincidentally, I was now feeling most of the pressure.
So I undid the stitching and got rid of the rest of the thick lining. I
clamped the front of the leather helmet to a vise and used it to
stretch it out as much as I dared. I used a little superglue to
re-close the seam that had overlapped the lining.
Using It
To don the headset, I slide it down most of the way over my head. Then
I reach up, grab each of the dangling ear buds in turn, and insert them
into my ears. Then the helmet comes down the rest of the way. Before
buckling the chin strap,snake a finger up under the cups and seat the
ear buds better. With the ear buds in place, no wires stick out
below the ear cups.
In flight...it works fantastic. I was able to run the volume control a
bit lower than I usually do with my ANR headset. The Passive
attenuation of the headset is pretty good now, since there's nothing
sticking out into the breeze other than a little streamlined rubber
bump on each side (I think a lot of the noise I get with the other
headset is turbulence on the headset itself). Plus, the ear buds
themselves act as ear plugs...while delivering the signal more directly
to my ear drum.
I did find the in-the-ear plugs a bit more uncomfortable, and there
seemed to be a bit of "popping" when my jaw moved as I spoke on the
radio.
All-in-all, though, I thought it worked darned nicely.
Details on the Wiring
I got an email from someone who
wanted specific details on how to build the adaptor. This section
describes how to build it, including the Radio Shack part numbers for
everything needed to plug in small commerical headsets into an aircraft
radio. If your headset uses a 1/4" plug (which is standard for
larger headsets) you'll need to replace the 1/8" jack with a 1/4" one.
Aircraft radios have weird standards...in the civilian world, speakers
have a near-standard impedance of 8 ohms, but aircraft radios expect
impedances around 300 ohms. Hook a civilian headset right to and
aircraft radio, and you won't get a very loud output.
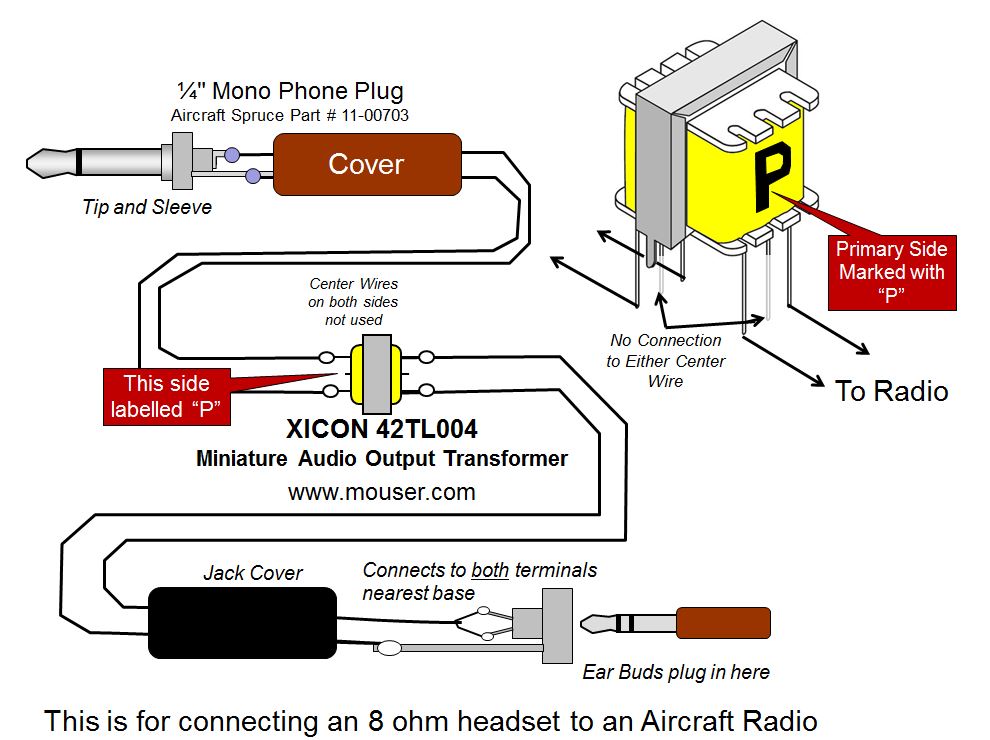
Fortunately, Radio Shack sells a nice little audio output transformer
that we can use to match the 300 ohm output impedance of the radio with
the 8-ohm impedance of the ear buds. That's what's shown on the
diagram.
The hardest thing about this will be to solder the wires to the lugs on
the 1/4" phono plug (that plugs into the radio output) and the 1/8"
jack (where the ear buds plug in). If you can find a MONO jack,
you're better off, but Rat Shack only seems to sell a stereo one.
This means that one of the wires connects to the "shell" of the jack,
but the other one has to connect to both of the other two lugs.
Note that the drawing isn't to scale!
On my headset, I installed the transformer inside an old plastic 35 mm
film canister. This is located along the earphone cord, about 12"
from the helmet (distance not important, other than wanting to get it
clear of your head).
Another Approach
I'd thought I was the first guy to think about converting an IPOD
headset for aviation use, but after mine was finished, I discovered a
write-up by Carl Peters on the RV Mailing list that described
the same process. This one's kind of neat, as it
includes the instructions for building the mike and shows how you can
add a volume control.
Ron Wanttaja
Update: Taking An Interesting Tangent
March 2009
Text of emails and photo by Don
Undeen, both reproduced with permission.
The Russian Helmet saga took a very, very odd turn that still gives me
a chuckle.
Not a week after I got my IPOD conversion of the helmet finished (and
before posting the story of my IPOD conversion), I got an email from
Mr. Don Undeen of New York City.
Don isn't a pilot. He's a guy who likes music, and had a wacky
idea to...well, let him explain for himself:
"See,
I picked up what's probably a Chinese Air Force helmet from the 1970's
which looks very similar to yours. Measuring the impedance on the
headphones also reads about 3k Ohms. Hooking up to my IPOD, I can hear
a faint signal.
"What I'd really like to do is turn
this into a working set of headphones for my IPOD, for a fun/goofy way
to listen to music."
I had spent an evening or two mounting a set of IPOD ear buds into my
helmet to work with my aircraft radio...but he was looking to using the
STOCK headset speakers to use INSTEAD of a set of ear buds on his
IPOD. The irony had me rolling on the floor,
laughing.
The goofy thing is, the circuit needed is PRACTICALLY THE SAME AS SHOWN
above. It needed to match the 8-16 ohm output impedance with the
3000-ohm impedance of the headphones. All that was really
necessary was to reverse the end connections (replace the 1/8" jack
with an 1/8" plug, and run the two wires that normally go to the 1/4"
jack to the speakers) and basically double the circuit to get stereo..
"But why?" you might
ask. Why use a hot, itchy leather helmet to listen to music?
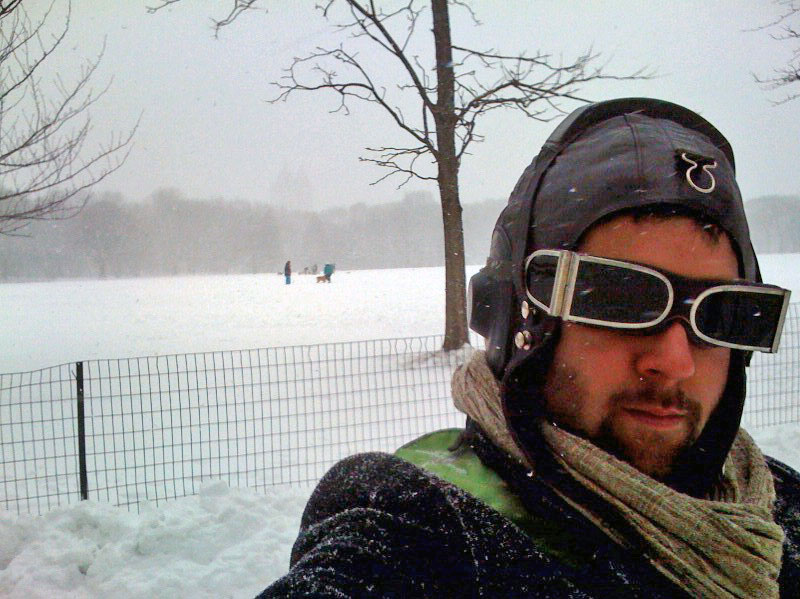
Personal style, sure, but there's a good practical side, too. The
weather in NYC this winter has been cold and snowy. As Don
reported, "I walked across central park on the way to work this
morning, in a
snowstorm, warm and cozy in my helmet, eyes protected with the goggles,
and rocking out to tunes! Made quite the splash with the front desk
guards!" (The goggles came with the helmet.)
Performance-wise, Don says, "You gotta crank the volume all the way up,
and turn down the bass a
bit, but the sound quality isn't half bad. For listening to this like
voice and acoustic guitar, it's actually pretty nice!" My guess
is that the stock earphones aren't all that efficient (they were
probably designed to work with vacuum-tube amplifiers, which had much
higher voltage) and, of course, the designers were interested more in
voice clarity than reproducing low-frequency bass notes.
We've since discussed potentially replacing the headset speakers with
"normal" speakers...but in any case, Don has a real stylish set of IPOD
headphones, and it was a lot of fun to work with him to get it
converted. Spaceeba!
[I'd be happy to pass on the schematic if anyone else wants to try this
conversion. Keep in mind that, as Don mentions, the performance
doesn't quite match the stock headphones.]
Ron Wanttaja
 Return to the
Stories Page
Return to the
Stories Page