Questions? Email Ron Wanttaja .
 Return
to the Fly Baby Home Page
Return
to the Fly Baby Home Page
This are of pretty good interest to Fly Baby builders. There are a number of hints and suggestions, and a total of 200 pages (printed double-sided, so there are only 100 sheets). Be advised there is an equal amount of "What Joe Smith is working on now" sort of information...vital and informative when the newsletter is mailed out, but of less use to builders thirty years later. It's fun to read, though.
Anyway, I ran some copies for the Fly Baby mailing list members,
and
have about five left. I'm selling these for $20, US Postage
paid.
Email
me for ordering information.
Thanks, Jeff!
[Oct 2005 update: After a discussion on the Fly Baby
mailing
list,
two of us went out and weighed our removable turtledecks.
Both
weighed
10 pounds]
First off, the Fly Baby has "Conventional", or "taildragger" gear. It's well-behaved as a taildragger, but it has all the quirks of the breed. If you've never flown one before, get ten hours of dual in a Citabria or similar aircraft before tackling a Fly Baby.
The Fly Baby tracks pretty straight. However, there is a relatively narrow speed range around 35-40 MPH where it tends to get a little squirrelly. You don't really notice it on a normal takeoff, since you accelerate through the range relatively quickly. However, if you try some "high speed taxiing" before your first flight, you might end up coasting along this range. I do not recommend high speed taxi testing for this reason. Make one run, if you want. But you're taking a lot less risk by just taking off than by holding partial power for a high-speed run.
There is one aspect of Fly Baby flight, however, that tends to get some people needlessly worried: The way the landing wires sag (and shake) in flight.
Fly Baby wings are wire-braced, just like a biplane but without the "bi". The landing gear is rigid under the fuselage. The flying wires run from the wheel hubs to the spars, about 60% towards the wingtip. The fitting goes through to the top of the wing, where the landing wires run to the cockpit area. Here, the landing wires attach to a steel strap which goes through a socket in the fuselage to a shelf in front of the instrument panel. A large turnbuckle joins the two straps.
Tightening the big turnbuckle does an overall tightening of the entire wing bracing. As the turnbuckle is tightened, the dihedral increases (slightly, of course) and the flying wires grow tighter.
When the plane is in flight, the weight of the aircraft is supported by the wings. The flying wires (under the wing) go bar-taut. At this stage, the landing wires aren't under any tension at all...so they go slightly slack. They sometimes even "shiver" in the slipstream.
It's no problem at all. You can reach out, grab a handful and shake 'em back and forth. You could even take a bolt-cutter to 'em, and it wouldn't make any difference. In flight, they aren't loaded. I've even tightened the center turnbuckle in flight. They still shake. An "arrow" running between the wires seem to help damp out much of the shaking. I've seen 'Babies with little "stabilizer fins" on the arrow to try get it stable.
However, I should note one possible source of too-slack landing wires: The steel strap they attach to is shaped like a sideways letter "T", with the base of the T going through the socket in the fuselage (See the drawing under "Wing Folding". If the landing wires are too long, the shoulder of the T "bottoms out" on the socket when the turnbuckle is tightened, and the wires never do get tight. This happened on N500F. The solution is to adjust the individual turnbuckles on each landing wire to get the general length of the wires shorter and prevent the T from bottoming out. When you fly, note which wires flap the most, and after you land, slightly tighten their turnbuckles.
Again, it's an aesthetic issue, not a safety one.
But when the stall breaks, it breaks abruptly. It's not a gentle Cessna-type stall, but it's not especially vicious, either. The nose drops abruptly to about 20 degrees below the horizon. A wing may drop as well, depending on rig and/or whether you're holding some rudder. It recovers nicely and with standard techniques.
Before you ask: I've never spun one. People who have report no problems.
Second, the Fly Baby has no shock absorbing capability other than the tires.
The stiff landing gear is probably the biggest actual problem most new Fly Baby pilots have. The solution, at first, anyway, is to wheel-land for the first ten hours or so. On a wheel landing, approach at a slightly higher speed and try to fly the plane down to "grease" the wheels down. I find the results far better than attempting stall landings.
One mitigating factor: the Fly Baby landing gear is extremely hell-for-stout. N500F had had almost 300 pilots fly it over the past 35 years, and I watched some of them REALLY slam the airplane down.
It's embarrassing, but rarely damaging. It doesn't take long to
pick
up the knack.
To understand how Fly Baby wing bracing works, see the Bracing page.
If you haven't read it yet, take a look at the information available on the loss of Fly Baby N96MG . I really, REALLY recommend that people use ordinary cable like Pete specifies, and don't "upgrade" their airplanes with streamlined flying wires.
The alerts came about when rotting in the Station 5 Bulkhead (the one behind the pilot) allowed the wing to come free in flight. When a plane is in flight, the forces tend to pull the wingtips forward and up. If the aft spar carry-though is allowed to deteriorate, the aft spar pins just pull through the rotted wood and down you go
It should be noted that this failure occurred in an airplane that had sat outside neglected in Florida for years. It underwent only a cursory inspection prior to the fatal flight. The prototype Fly Baby flew over thirty years without this modification.
The reinforcement can be accomplished in either of two ways. If the aircraft is still under construction, two steel straps are attached to the lower carry-through between the two holes for the spar pins. This gets the carry-through out of the equation. Basically, it's just a pair of 1.25" wide .062" piece of 4130 steel running between the holes in the carry-through where the spar pins are inserted.
If the aircraft is already completed, separate diamond-shaped .062" steel plates are bolted on either side of the carry-through at the pin locations. Full details are contained on Pages 9-6 and 9-7 of the Fly Baby Assembly Manual.
It's not a critical mod... assuming you don't have any rot at the carry-though or wing spars. And if you do, I suggest grounding the aircraft immediately in any case.
To check for rot, you'll need a sharp jackknife. The basic procedure is to lightly jab the knife into the wood. If it doesn't hardly penetrate, there's probably no rot. If it goes in easy, it's rotted.
It's a good idea to check this area for rot at every annual. To do the procedure on a Fly Baby, start by removing the wings. Jab the spar butts (one or two is all that's necessary, you don't have to play mumbly-peg) on the wings themselves, and reach into the wing through the access holes in the root rib and check the lower part of the spar. When the wings get a clean bill of health, test the areas outboard of the spar pin holes on the Station 5 carry-through.
Again, most Fly Babies don't need the mod. The reinforcement is mostly for peace of mind.
At about 1700 hours total time, it was discovered that one of the legs of the horn was tearing off right at the bend line. The tear was almost 3/4ths of the way through when discovered.
While the design is similar to the rudder horn, the rudder horn is flat and incorporates a bend at the leading edge to strengthen it. The legs of the Tailwheel Horn bend down at a 45 degree angle and thus can't incorporate a bend.
Our fix on N500F was to weld up the crack and add stiffeners to the legs by welding on small triangular pieces of steel at the leading edge.
If you're flying a completed Fly Baby, keep an eye on this area. If you're building one, go ahead and install a modified horn instead of the stock one.
For some reason, many Fly Baby builders seem to leave these off. I've never flown one without seals on the rudder and elevators, but both the Prototype and the one I bought in 1996 didn't have the seals on the ailerons.
The plane definitely flies better with the aileron gap seals in place. Without them, roll seems a lot more sluggish.
If you haven't covered yours yet, install the seals as shown in Figure 7-5 of the plans. If you have covered your plane, fear not: The solution is easy and cheap.
Disconnect the aileron pushrod at the aileron. Get a friend to hold the aileron as far up as it'll go.
Then take a strip of Duct Tape and install it over the gap from
underneath.
Here's a drawing::
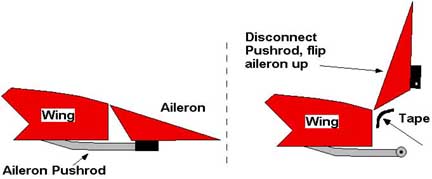
You can't do it with a single strip of tape....you don't want to
run
the tape over the piano hinges or it'll start trapping dirt
that'll
make
your hinges stiff. Leave a ~1/8"-1/4" gap either side of
each
hinge.
That's it! The fabric method generally looks better and last longer, but this isn't half bad. You will have to replace it every two years or so.
Note that the duct tape is applied from underneath, NOT on top!. Yes, I know it's harder, but here's what happened when Drew Fidoe put tape on the top:
For gap seals on the rudder and the elevators, see the Proshold Gap Seals.
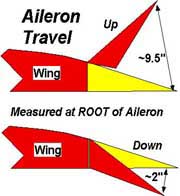 Aileron Travel
Yes, those numbers are right: About 9.5" up, 2" down. It definitely looks a bit funny, 'cause you move the stick to the left and the left aileron seems to go waaaaaay up, but when you move the stick the other way, it barely seems to sink below the level of the wing. But that's the way it's supposed to be.
(Photo courtesy of my cyber-bud (and former co-defendant) John Ousterhout)
Going to 1/4" ply adds a lot of completely useless weight...you're not even making the airplane any stronger.
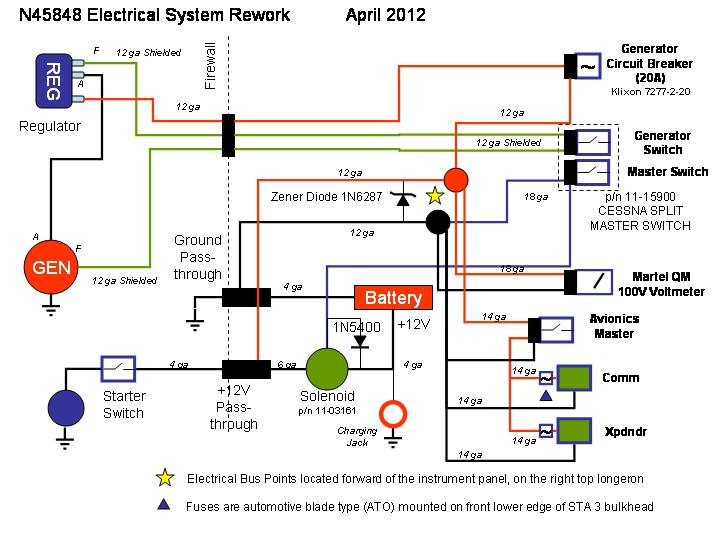
You don't need an electrical system in your Fly Baby. Here's why:
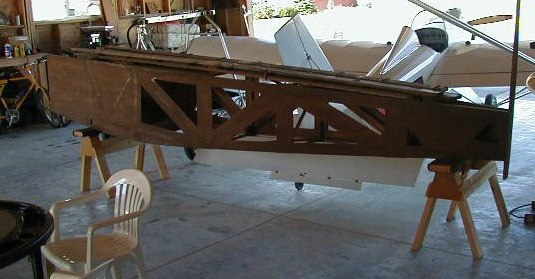
Turtledecks: The Fly Baby plans show a removable turtledeck section (the turtledeck is the area above the longerons behind the pilot. I've seen some builders simplify their crafts by building a permanent turtledeck.
You want it removable.Turtledeck Door: Pete shows two possible door sizes for the access door in the Turtledeck...a kind of half-door, and a full width door.Not for any safety reason, or in fact, any reason I can specifically point to.
But the removable turtledeck makes working on the plane a lot, lot easier. Getting in and out is easy. If you have to work from the cockpit, you can rest tools and parts on top of the flat plywood surface. If you're working on the panel, you can sit on the plywood with your feet on the seat.
The removable turtledeck makes maintenance a lot easier. Trust me. Build it per plans.
BUILD THE FULL-WIDTH DOOR!!!!!!When I bought N45848, it had the small door. You can't fit a greasy piglet through the thing. I couldn't even reach all the way back in the turtledeck through the small door.
I enlarged the door. Now, I can dig stuff out from anywhere under the Turtledeck. I can cram a camera bag or overnight bag into the compartment.
Definitely build a removable turtledeck with a full-size door. Why did Pete show a half-size door as an option? Because he had at one point anticipated that the turtledeck itself could be disassembled and carried beneath a turtledeck supporting a sliding canopy.
Access Panels: The more access panels
you install during the construction process, the easier
maintenance is
going to be, later.
When N500F, the prototype, was rebuilt in 1982, Cecil Hendricks and the Chapter 26 crew added a foot-wide access panel in the belly. It ran from the bulkhead behind the pilot to the access panel under the rudder pedals. It spanned the section between the two belly stringers, held in place by a bunch of angle nuts tacked to the sides of the stringers.Tires: As mentioned earlier, the only shock absorbing capacity of the landing gear is in the tires. Pete designed the Fly Baby to mount 8.00x4 Cub tires, which are fat, low-pressure units with a lot of "give" to them.It made maintenance a lot easier. You can work on the control system and elevator bellcrank from underneath instead of diving in from on top. If you have to work under the panel, you can dangle your feet out the bottom of the airplane (or even stand on the ground) instead of having to fold almost in half.
Speaking of the access panel under the rudder pedals, this one can be somewhat of a beast to take on and off, depending on how you route your brake lines. You have to bend the beast almost in half to get it to clear the landing gear bracing wires.
I converted mine to two-piece... cut a piece of 2" wide aluminum to run down the middle, drill pop-rivet holes on one side and three 3/16" bolt holes on the other. Then cut the panel right down the middle, rivet the strip to the inside of one side, install anchor nuts on the free side, and now you can install the panel in two parts.
Unfortunately, they're getting rare and expensive. Most builders end up using something else.Seat: Most Fly Baby pilots seem to agree: Pete was having an "off day" when he designed the seat for the Fly Baby.My recommendation is a set of 8.00x6s, kept a bit under inflated. I have a set now, and they seem to do quite well. Look right, too. Cost difference between 7.00s and 8.00s is not that big.
It has most of the good attributes of a piece of aircraft hardware: It's light, it's sturdy, it's adjustable, it takes little time to build.It is also as uncomfortable as all getout. It's two pieces of plywood hinged to each other. When you're sitting on it, your points of contact are concentrated into one small area on your rear end and one small area on your back. It's OK for short flights, but it really gets uncomfortable after 45 minutes or so.
It's not hard to come up with another seat. On N500F, I built a wood frame for the bottom and curved the upper side rails to a seat design...then bent a piece of aluminum over the top surface. The back was a U-shaped frame of aluminum tubing, with thin sheet straps across it like a lawn chair. For Moonraker, I bought a fiberglass chair at the local surplus store for $5. The seat part unbolted cleanly from the legs, and I just built a frame to match.
It's not something that has to be done before the first flight. But I think you'll want to eventually count on another seat.
May 2003: Jeff Gray send me a write-up and photos of the custom seat he built for his Fly Baby. Looks like a good option....
By the way, you may be interested to know that in Canada, a Flybaby may be flown with an Ultralight Pilot Permit as it meets Canadian weight and stall speed requirements of an advanced ultralight . The aircraft need not be re-registered out of the amateur-built category. I do not recommend however, that an ultralight pilot attempt to fly one unless they have been trained on a "hotter" taildragger design of ultralight and are familiar with carb heat/mixture controls etc.Anyone wishing to do this in Canada must first apply to Transport Canada to have a modification to the C of R flight restrictions. If you are equipped with a higher horsepower engine, it may not fit the rule. Transport Canada will run your specs through the "chicken guts" formula and see what comes out. If anyone is interested I would be happy to walk them through the process and give them the contact names in Transport Canada in the Toronto region.
Between a combination of tailwheel spring stiffness, tire condition, tire inflation, temperature, and taxi speed, the airplane sometimes starts bouncing up and down on its tires as it taxies along. It's not dangerous, it doesn't affect control. It's just an odd boing-boing-boing as you taxi merrily along. It's like someone dribbling a basketball.
It is totally harmless. I've never had it happen during takeoff run or landing roll. It tends to occur when the tires are stiff...new tires, freshly-inflated, and especially in colder weather. If you get the "dribbles", just slow down or speed up...it'll go away.
Sport Aviation
Dec 1962 Bowers Fly Baby
Apr 1963 Fly Baby (Mods. 0-290G)
July 1963 Fly Baby
Aug 1963 Fly Baby on Floats (Part 1)
Sep 1963 Fly Baby on Floats (Part 2)
Dec 1969 Fly Baby Biplane
Aug 1970 Cross Country in the
Biplane
Sep 1970 The Lash Fly Baby
Dec 1971 Fly Baby with
Luscombe
Wings
Mar 1972 Future Birdman Starts
Young at Plane Building
Jul 1972 Two-Place Fly Baby
(Side-by-side)
Sep 1972 Fly Baby and
Aerobatics
by Peter Bowers
Dec 1972 The Inside Story of a
Fly Baby Project
Feb 1975 Boyhood Dream
Aug 1975 George Rotter's Fly
Baby
Aug 1976 The Pink Baroness
Sep 1976 The Flight of Mr.
Gator
May 1980 Fly Baby (Bird)
Jan 1983 Mounds of Joy
Aug 1986 Low and Slow to
Oshkosh
We Go (Part 1)
Sep 1986 Low and Slow to
Oshkosh
We Go (Part 2)
Jan 1988 Fly Baby.... The
Silver
Anniversary
Aug 1991 Fly Baby Structural
Failure
Oct 1991 Fly Baby
Reinforcement
Strap
Dec 1992 30 Years Ago.... 1962
Cover Story
Kitplanes
Jun 1986 (pg. 32) Bowers Fly Baby
Jan 1988 (pg. 30)
Jun 1988 (pg. 22) Arnie's Legacy
(Fly
Baby Biplane)
Feb 1989 (pg. 12) Fly a "Nouvelle
Classique"
Aug 1989 (pg. 72)
Apr 1991 (pg. 22)
Apr 1998 (pg. 74) Make Mine A Fly
Baby
The Experimenter
Aug 1998 Fly Baby Structural Failures
Note that if you are an EAA member, you can order reprints of
Sport
Aviation and Experimenter articles....